Jekyll Usages

jekyll 기본 사용

  • 지킬 사이트의 테마 이용
  • 전역 설정
  • 글쓰기
  • 사이트 변환

New site

new 명령을 jekyll의 gem-based themes 를 사용하게 구성해 준다.
혹은 빈 폴더에서 새롭게 구성할 수 있다.

jekyll new

jekyll new로 생성되는 사이트는 gem-based theme를 사용한 jekyll project bootstrapped 로 생성된다.

jekyll new SITE_NAME 으로 생성

1
$ jekyll new myblog

아래 같은 템플릿 파일로 구성되다.

1
2
3
4
5
6
7
Gemfile
Gemfile.lock
_config.yml
_posts/
_site/
about.md
index.md

중요한 구성 파일은,

파일 설명
_config.yml 설정 파일
_drafts 발행하지 않은 준비중인 포스트.
_includes 재사용 가능한 조각 파일로, _post, _layouts에서 사용
_layouts 포스팅 글의 배치를 할 수 있다.

빈 사이트 만들기

1
$ jekyll new myblog --blank

디렉토리 구조만 생성된다.

1
2
3
4
_draft/
_layout/
_posts/
index.html

_config.yml

1
2
3
4
markdown: kramdown
highlighter: pygments
permalink: pretty
relative_permalinks: false

Jekyll 실행 환경을 지정할 수 있다. 예를 들어 디버깅, 개발, 운영 환경으로 구분한다면 코드에 다음 같이 넣을 수 있다:

1
2
3
{% if jekyll.environment == "production" %}
{% include disqus_comments.html %}
{% endif %}

jekyll을 실행시 JEKYLL_ENV에 값을 지정해 줄 수 있다. 기본 값은 development 이다.

1
2
$ JEKYLL_ENV=production bundle exec jekyll build
$ JEKYLL_ENV=production jekyll build

지킬의 포스트 등에서 사용하는 변수는 https://jekyllrb.com/docs/variables/ 에서 확인할 수 있다.

github 지원 config items

아래는 GitHub에서 기본으로 제공하는 설정으로 사용자가 원하는 대로 변경이 가능한 설정.

1
2
3
4
5
6
7
8
9
10
11
12
13
14
15
github: [metadata]
kramdown:
input: GFM
hard_wrap: false
gems:
- jekyll-coffeescript
- jekyll-paginate

lsi: false
safe: true
source: [your repo's top level directory]
incremental: false
highlighter: rouge
gist:
noscript: false
  • lsi : 관련 포스트글에 대한 인덱스를 생성.
  • safe : 사용자 플러그인을 비활성화 하고, 심볼릭 링크(symbolic links)를 무시.
  • source : Jekyll이 읽을 파일의 위치를 변경.
  • incremental : 수정 변경한 포스트만 다시 빌드하는 옵션.
  • highlighter : rough highlighter 지정
  • gist : GitHub gist 사용 설정.

post

포스트는 _posts 폴더에 저장한다. yyyy-mm-dd-파일명.markup( md 또는 markdown 또는 textile) 형식으로 포스트 파일명을 만들어야 한다.

파일 내용은 다음 같이 구성된다.

Front matter
BODY

Front matter 는 다음 같이 구성되고, Front Matter, **머리말**를 참조한다.

YAML 머리말 블록을 가진 모든 파일을 특별한 파일로 인식하여 처리하고, 머리말은 반드시 올바른 YAML 형식으로 작성되어야 하며, 대시문자 3개(—)로 감싸서 파일의 맨 첫 부분과 끝 부분에 위치한다.

BODY 내용은 마크다운, 기타 문법 형식으로 작성하면 된다.

[]다른 포맷 지원](http://jekyllrb-ko.github.io/docs/plugins/#converters-1)

Front Matter 머릿말

세 개의 대쉬 라인(—) 사이에 메타 정보를 넣는다.

1
2
3
4
5
6
---
layout: post
title: "Welcome to Jekyll!"
date: 2017-05-03 18:53:47 +0900
categories: jekyll update
---
  • 빈 메타 정보는 빈 두개의 — 로 둔다.

Front matter 에 사용할 수 있는 내장된 변수는 다음 같다:

변수 설명
layout 사용할 레이아웃 파일을 지정한다. 레이아웃 파일명에서 확장자를 제외한 나머지 부분만 입력한다. 레이아웃 파일은 반드시 _layouts 디렉토리에 존재해야 한다.
permalink 생성된 블로그 포스트 URL 을 사이트 전역 스타일 (디폴트 설정: /year/month/day/title.html)이 아닌 다른 스타일로 만드려면, 이 변수를 사용하여 최종 URL 을 설정하면 된다.
published 사이트가 생성되었을 때 특정 포스트가 나타나지 않게 하려면 false 로 설정하라.
category,categories 포스트를 특정 폴더에 넣지 않고, 포스트가 속해야 하는 카테고리를 하나 또는 그 이상 지정할 수 있다. 사이트가 생성될 때, 포스트는 그냥 평범하게 이 카테고리들에 속한 것처럼 동작한다. 두 개 이상의 카테고리들을 지정할 때에는 YAML 리스트 또는 쉼표로 구분된 문자열을 사용한다.
tags 카테고리와 유사하게, 하나 이상의 태그를 포스트에 추가할 수 있다. 또 카테고리와 동일하게, YAML 리스트 또는 쉼표로 구분된 문자열로 지정할 수도 있다.

외부 자원

이미지, 다운로드 파일 등을 사용할 때는 루트 디렉토리의 images, assets, downloads 라는 디렉토리를 만들고 그곳에 둔다. 그리고 해당 자원의 참조를 / 경로를 기준으로 삼으면 된다.

1
![친절한 스크린샷](/screenshot.jpg)

site.url 변수

1
![친절한 스크린샷]({{ site.url }}/assets/screenshot.jpg)
1
 PDF  직접 [다운로드]({{ site.url }}/assets/mydoc.pdf)할  있습니다.

Build

실제 웹 사이트에는 html 파일로 제공되야 한다. 그러기 위해서 serve 혹은 build 명령으로 마크다운 파일을 변환해야 한다.

jekyll serve 명령은 지킬 사이트 디렉터리 안으로 접근하여 실행해야 한다.

serve 명령으로 빌드한 html과 파일은 _site 폴더에 생성된다.


### Theme

Jekyll은 기본 테마로 Minima라 불리는 gem-based theme를 사용한다. 이 테마를 구성하는 파일은 jekyll new 명령으로 위치에 다음 같이 구성된다.

Minima 테마는 assets, _layouts, _includes, and _sass 디렉토리를 실제 Minima theme gem 디렉토리에 위치하고 있고 아래 같은 구성으로 사이트가 생성된다.

1
2
3
4
5
6
7
├── Gemfile
├── Gemfile.lock
├── _config.yml
├── _posts
│ └── 2016-12-04-welcome-to-jekyll.markdown
├── about.md
└── index.md

다른 Theme gem을 사용하려면 bundle update를 실행하거나 bundle update <THEME> 로 사용할 를 지정한다.

jekyll은 사이트 접근시 처음에 컨텐츠를 아래 폴더 안에서 찾는다.

  • /assets
  • /_layouts
  • /_includes
  • /_sass

예를 들어 post 레이아웃을 사용하고 있다면 _layouts 폴더에 _layouts/page.html 테마 파일을 생성해 변경할 수 있다. 처음부터 생성하는 것 보다 기본 테마 파일을 이용하는 것이 빠르다.


#### 기본테마 Manima

Minima 테마의 기본 폴더는 bundle show minima 명령으로 확인이 가능하다. 기본테마 디렉토리는 아래 같이 구성되어 있다. 테마 정의에 필요한 _includes/, _layouts/, _sass/, assets/ 폴더이다.

1
2
3
4
5
6
7
8
9
10
11
12
13
14
15
16
17
18
19
20
21
22
23
├── _includes
├── disqus_comments.html
├── footer.html
├── google-analytics.html
├── head.html
├── header.html
├── icon-github.html
├── icon-github.svg
├── icon-twitter.html
└── icon-twitter.svg
├── _layouts
├── default.html
├── home.html
├── page.html
└── post.html
├── _sass
├── minima
├── _base.scss
├── _layout.scss
└── _syntax-highlighting.scss
└── minima.scss
└── assets
└── main.scss

기본 테마 재정의 하기

Jekyll theme는 기본 layouts, includes, stylesheets를 지정하는데, 이것을 사이트 콘텐트에 맞게 재정의할 수 있다.

Minima 테마의 기본 폴더는 bundle show minima 명령으로 확인이 가능하다. 그리고 아래 같이 찾아서 열어 볼 수 있다. 먼저 macOS 는

1
open $(bundle show minima)

Windows 에서는

1
explorer /usr/local/lib/ruby/gems/2.3.0/gems/minima-2.1.0

기본 테마 디렉토리 구조를 복사해 와서 작업하겠다.

1
2
$ cd `bundle show minima`
~minima-2.1.1$ cp -r _includes _layouts _sass assets ~/mysite/

각각의 테마 요소를 알아보자.

Layout

컨텐츠의 구성은 _layouts 폴더에 넣는다. 이렇게 구성해 보자

1
2
3
default.html|
├<-- post.html
├<-- page.html


### sass

_sass 디렉토리에 .sass 파일을 두면 sass 컴파일러가 컴파일 한다.

fonts

외부 폰트, ttf, otf 등의 폰트를 _assets/fonts 같은 폴더에 다운로드하고 css로 불러와 사용한다.
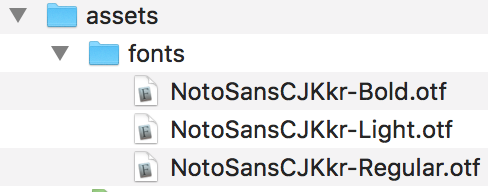
그리고 _sass/main.scss 등의 css 파일에 다음 같이 폰트를 선언한다.

1
2
3
4
5
6
7
8
9
@font-face {
font-family: "NotoSansCJKkr-Regular";
src: url("../_assets/fonts/NotoSansCJKkr-Regular.otf") format("opentype");
}
@font-face {
font-family: "NotoSansCJKkr-Bold";
src: url("../_assets/fonts/NotoSansCJKkr-Bold.otf") format("opentype");
font-style: bold;
}

그리고 html 혹은 css 에서 font-family 이름을 사용하면 된다.

1
2
3
4
h1,
h2 {
font-family: "NotoSansCJKkr-Bold";
}


### Disqus

disqus.com 에서 새 사이트를 구성하고, Jekyll 을 선택하면 Universal code 를 얻을 수 있다.


#### Disqus Universal Code 설치
  1. comments 변수

comments 변수를 YAML Front Matter에 추가하기 위해, Jekyll의 manima 테마에서 _layouts/post.html 에 변수를 추가해 준다.

1
2
3
4
---
layout: default
comments: true
---
  1. Universal code
`{% if page.comments %}` 와 `{% endif %}` 태그 사이에 Universal Embeded Code를 추가해 준다. manima 테마의 \_includes/disqus_comments.html 파일에 구성되어 있다. 코드에서production을 developement로 바꿔서 테스트 해보자.

댓글 수 표시

태그 전에 아래 스크립트를 원하는 위치에 둔다.
1
2
3
4
5
{% if page.comments %}
<!-- Disqus comment count -->
<script id="dsq-count-scr" src="//{{ site.disqus.shortname }}.disqus.com/count.js" async></script>
{% endif %}

href 속성에 #disqus_thread 를 추가하기 위해서, _layouts/post.html 템플릿에 다음을 추가한다.

1
2
3
4
5
6
{% if page.author %}
<span itemprop="author" itemscope itemtype="http://schema.org/Person"><span itemprop="name">{{ page.author }}</span></span>
{% endif %}
{% if page.comments %}
<a href="{{ site.url }}{{ page.url }}#disqus_thread">Comments</a>
{% endif %}

이제 제목 밑에 disqus 링크가 표시된다.

{:width=”400”}

조건에 page.conmments 를 참조하면 post 에 comments: true 가 정의되면 되고, layout 전체를 담당하려면 아래 같은 layout.comments 를 비교한다:

1
2
3
{% if layout.comments %}
<a href="{{ site.url }}{{ page.url }}#disqus_thread">Comments</a>
{% endif %}


### Google Analytics

jekyll new 로 새 사이트를 설치하면 __includes/google-analytics.html 이 포함되어 있다. Google Analytics에서 Tracking ID를 발급받아 사용하면 된다.


#### Tracking ID

Google account가 있으면 손쉽게 만들수 있다.여기 에서 로그인해서 Admin > Property > Tracking Info > Tracking Code 에서 찾을 수 있다.

Tracking ID{:width=”400”}


#### 설정

파일 __includes/google-analytics.html 안의 {{ site.google_analytics }}에 Tracking ID가 치환 되는데, 이것은 _config.yml 파일 google_analytics: 항목에 본인의 Tracking ID를 입력한다.

1
2
# Google services
google_analytics: UA—XXXXXXXX-X

#### default.html

이 파일을 _includes/head.html 파일에는 production 모드에서 analytics가 적용이 된다.

1
2
3
{% if jekyll.environment == 'production' and site.google_analytics %}
{% include google-analytics.html %}
{% endif %}

운영모드인 production 은 github 에 업로드시 자동으로 적용된다. 만약 다른 사이트에 업로드하려면 빌드를 한다.
$ JEKYLL_ENV=production bundle exec jekyll build

Pagenation

지킬에서 jekyll-paginate gem 을 추가하면 페이지 구분을 추가할 수 있다.

https://jekyllrb.com/docs/pagination/

Gemfile과 _config.yml

Gemfile에 추가.

1
2
3
group :jekyll_plugins do
gem "jekyll-feed", "~> 0.6"
gem "jekyll-paginate"

config.yml에서 활성화:

1
2
3
4
5
6
7
8
gems:
- jekyll-feed
- jekyll-paginate

#페이지 활성화
paginate: 6


Custom Domain

github page를 github.io 서브도메인 대신 본인의 도메인에 등록하려면 두 가지를 한다:

  • 깃헙 페이지의 설정에서 custom domain 을 추가한다.
  • DNS에 CNAME을 등록한다.

Custom domain 추가

github 에서 github page 저장소의 Settings 에서 Custom Domain에 사용할 도메인 이름을 저장한다.

CNAME 등록

DNS에 CNAME 을 github의 USER_NAME.github.io 에 연결해 준다.
제대로 등록됐는지 dig 명령으로 확인한다.

1
2
3
4
5
$ dig docs.example.com +nostats +nocomments +nocmd
;docs.example.com. IN A
docs.example.com. 3592 IN CNAME YOUR-USERNAME.github.io.
YOUR-USERNAME.github.io. 43192 IN CNAME < GITHUB-PAGES-SERVER >.
< GITHUB-PAGES-SERVER >. 22 IN A 199.27.XX.XXX

참조: https://help.github.com/articles/setting-up-a-custom-subdomain/

Author

Gangtai Goh

Posted on

2017-05-07

Updated on

2023-01-12

Licensed under

댓글