$ pyenv doctor Cloning /home/USER/.pyenv/plugins/pyenv-doctor/bin/..... Installing python-pyenv-doctor... Installed python-pyenv-doctor to /tmp/pyenv-doctor.20250327094025.5063/prefix Congratulations! You are ready to build pythons!
기타
시스템에 빌드 도구가 설치되지 않으면 doctor 명령을 실행하면 다양한 에러를 낸다.
1 2 3 4 5 6 7
$ pyenv doctor ... ... configure: error: GNU readline is not installed. Problem(s) detected while checking system.
See https://github.com/pyenv/pyenv/wiki/Common-build-problems for known solutions.
$ systemctl status mariadb ● mariadb.service - MariaDB 11.3.2 database server Loaded: loaded (/lib/systemd/system/mariadb.service; enabled; vendor preset: enabled) Drop-In: /etc/systemd/system/mariadb.service.d └─migrated-from-my.cnf-settings.conf Active: active (running) since Tue 2024-03-05 06:32:22 KST; 7min ago Docs: man:mariadbd(8) https://mariadb.com/kb/en/library/systemd/
MariaDB 보안 설정하기
설치후에 MariaDB 시스템 초기화와 보안 설정을 진행해야 한다.
7개 질문이 나오는데 unix_socket 은 n 이고 나머지는 기본 값으로 진행한다.
단, root 패스워드는 잊어버리지 않아야 한다.
1 2 3 4 5 6 7 8 9 10 11 12 13 14 15 16
$ sudo mysql_secure_installation
Enter current password for root (enter for none):
Switch to unix_socket authentication [Y/n] n
Change the root password? [Y/n] Y
Remove anonymous users? [Y/n] Y
Disallow root login remotely? [Y/n] Y
Remove test database and access to it? [Y/n] Y
Reload privilege tables now? [Y/n] Y
이제 root 계정으로 명령행으로 접속해 보자
1 2 3 4 5 6 7 8 9 10 11
~$ mariadb -u root -p Enter password: Welcome to the MariaDB monitor. Commands end with ; or \g. Your MariaDB connection id is 40 Server version: 11.3.2-MariaDB-1:11.3.2+maria~ubu2204 mariadb.org binary distribution
Copyright (c) 2000, 2018, Oracle, MariaDB Corporation Ab and others.
Type 'help;' or '\h'forhelp. Type '\c' to clear the current input statement.
MariaDB [(none)]>
현재 11버전까지 mysql 클라이언트를 사용하지만 향후 deprecated 될 예정으로
mariadb 클라이언트 사용을 권장한다.
Option file 설정
설정 파일은 유닉스 계열은 my.cnf (or mariadb.cnf) 이고 윈도우 계열은 my.ini 이다.
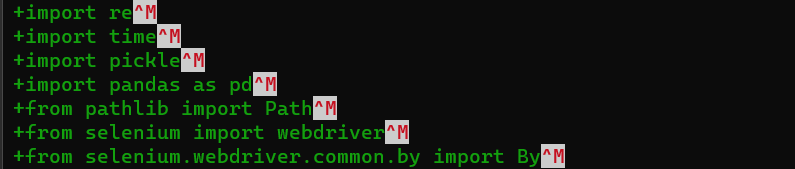
어느날 git 의 레포지토리의 파일이 모두 changed 상태로 보여 당황했다. 한 파일을 diff 로 보니 줄의 마지막에 ^M 이 보였다. 에디터가 OS에 따라서 LF 를 CRLF 로 바꿔서 보여주는 것이었다.
CRLF 상황
Linux 를 20.04 LTS 를 사용하다 os-release-upgrade 를 사용해서 22.04 LTS 로 업그레이드 했다.
그리고 한동안 다른 작업을 하다 소스를 다루게 되어서 윈도우 11에서 VS code 로 WSL의 우분투 폴더를 열어 보니 git 의 staging area 에 커밋할 파일이 엄청 들어와 있는 것이다. 찾다 보니 아래 그림 같이 줄바꿈 코드로 CRLR 로 인식을 한 것이다.
소스 파일을 수정할 일이 아니라서 검색을 좀 해보니 git 의 전역 설정에서 가능할 것 같았다. 다음 링크를 참조했다.
Swallow Clone 은 git 저장소에 커밋된 기록중 일부만 사용하는 기술 있다. 그런데 브랜치를 추가하면 원격지와 클론한 저장소에서 탐색이 안되는 단점이 있다. 여기서 swallow clone 에서 branch를 사용하는 방법을 요약한다.
Swallow Clone 에서 branch를 사용하자.
기본적으로 swallow clone 을 사용하면 원격 저장소의 branch 를 모두 볼 수 없다. 이것은 .git/config 를 보면 refs/remotes/origin/master 로 구성되어 있어서이다. 그래서 swallow clone 한 저장소는 원격 저장소의 master 브랜치만 보게 된다.