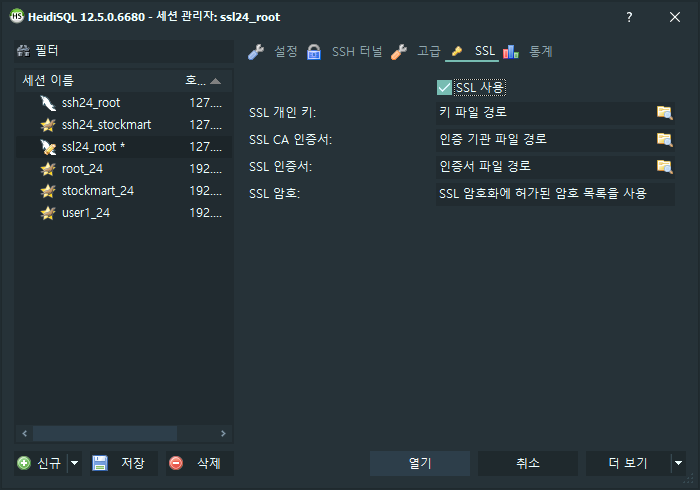
MySQL / MaraiDB 서버에 TLS 를 활성화 해서 암호화 통신을 할 수 있다. MySQL (MariaDB도 동일함)에서는 서버-클라이언트 사이에 전송되는 데이터를 TLS (이전 SSL) 프로토콜을 이용하여 암호화하여 DB 정보가 노출되지 않게 방지할 수 있다. SSL을 통해서 Replication Master - Slave 도 가능하다.
인증서는 사설 CA(Certificate Authority)용 인증서, 서버용, 클라이언트용 총 3가지를 만든다.
인증서 저장 위치 생성
1 2
(SERVER) $ sudo mkdir /etc/ssl/mysql (SERVER) $ cd /etc/ssl/mysql
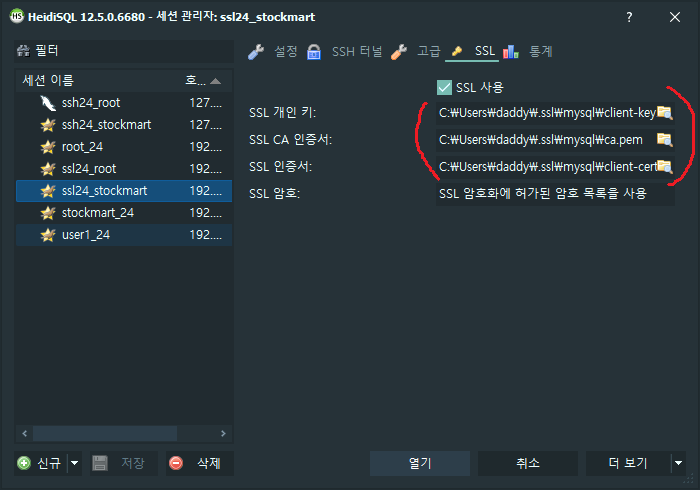
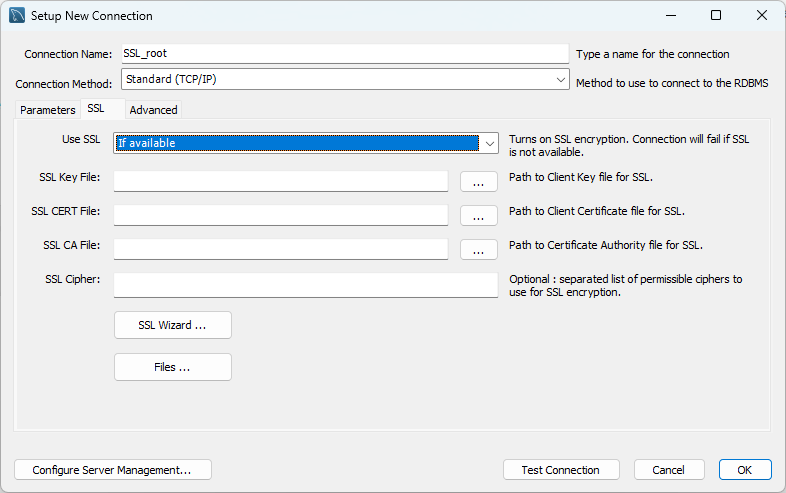
생성한 TLS 인증서는 MySQL/MariaDB 의 my.cnf 설정파일의 변수를 3가지 설정한다.
ssl_cert 시스템 변수: 서버 인증서(X509) 경로 지정
ssl_key 시스템 변수: 서버 개인키 경로 지정
ssl_ca 혹은 ssl_capath 시스템 변수: Self-signed CA certificate CA 키 경로
openssl 사설 CA 인증서 생성
저장 위치 /etc/ssl/mysql 에서 관리용 CA 인증서 생성한다.
먼저 openssl에서 rsa 알고리즘으로 4096 크기 비밀키를 생성한다.
1 2 3
(SERVER) $ sudo openssl genrsa -out ca-key.pem 4096 Generating RSA private key, 4096 bit long modulus (2 primes) ...
비밀키 파일 ca-key.pem 파일을 사용해서 CA인증서 ca.pem 파일로 생성한다. 비밀키로 CA를 위한 CSR(certificate signing request) 과정을 거쳐 ca.pem 을 생성해9서 필요한 인증서 정보를 묻는다.
1 2 3 4 5 6 7 8 9
(SERVER) $ sudo openssl req -new -x509 -nodes -days 365000 -key ca-key.pem -out ca.pem ... Country Name (2 letter code) [AU]: KR State or Province Name (full name) [Some-State]:Seoul Locality Name (eg, city) []: Organization Name (eg, company) [Internet Widgits Pty Ltd]:YOUR company Organizational Unit Name (eg, section) []: Administration Common Name (e.g. server FQDN or YOUR name) []::mysql-admin.DOMAIN.name Email Address []:
Country Name (2 letter code) [AU]:KR State or Province Name (full name) [Some-State]:Seoul Locality Name (eg, city) []: Organization Name (eg, company) [Internet Widgits Pty Ltd]:YOUR company Organizational Unit Name (eg, section) []:Administration Common Name (e.g. server FQDN or YOUR name) []:server.DOMAIN.name Email Address []:
Please enter the following 'extra' attributes to be sent with your certificate request A challenge password []: An optional company name []: ...
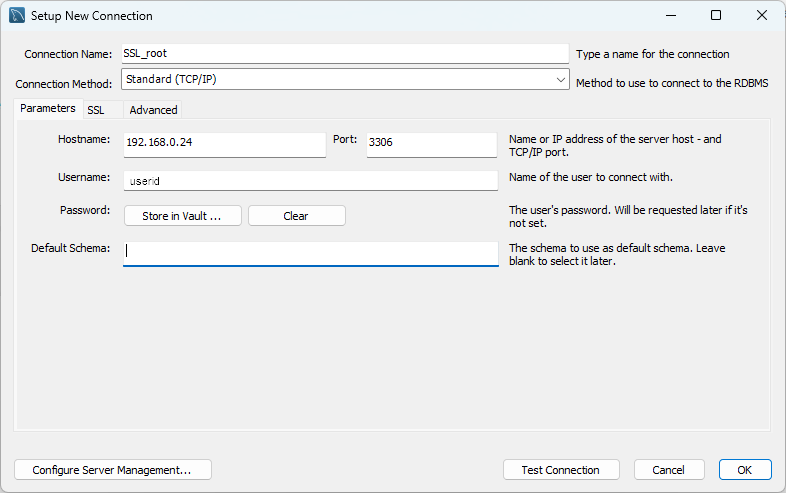
클라이언트 인증서는 다음과 같은 용도로 사용한다. 단, openssl 명령 과정에서 Common Name 을 3가지 모두 다르게 해야 검증오류를 피할 수 있다.
DB 서버와 별도로 존재하는 웹 서버에서 DB 서버로 SSL 통신을 할 때 웹 서버에 적용
접속하고자 하는 DB 서버와 별도의 리눅스 환경에서 mysql 클라이언트 프로그램으로 DB 서버에 접속할 때 클라이언트에 적용
Replication 에서 Master와 Slave 간의 SSL 통신을 하고자 할 때 Slave 서버에 적용
1 2 3 4 5 6 7 8 9
(SERVER) $ sudo openssl req -newkey rsa:2048 -days 365000 -nodes -keyout client-key.pem -out client-req.pem Country Name (2 letter code) [AU]:KR State or Province Name (full name) [Some-State]:Seoul Locality Name (eg, city) []: Organization Name (eg, company) [Internet Widgits Pty Ltd]: Organizational Unit Name (eg, section) []: Common Name (e.g. server FQDN or YOUR name) []::mysql-client.thinkbee.kr
(SERVER) $ sudo openssl x509 -req -in client-req.pem -days 365000 -CA ca.pem -CAkey ca-key.pem -set_serial 01 -out client-cert.pem Signature ok subject=C = KR, ST = Seoul, O = Internet Widgits Pty Ltd, CN = client-thinkbee.kr Getting CA Private Key
1 2
(SERVER) $ sudo openssl verify -CAfile ca.pem client-cert.pem client-cert.pem: OK
현재 디렉토리를 접근 권한을 조정한다.
1 2 3 4 5 6 7 8 9 10
(SERVER) $ sudo chown mysql.mysql *.* (SERVER) $ ls -l -rw-r--r-- 1 mysql mysql 3243 7월 16 15:43 ca-key.pem -rw-r--r-- 1 mysql mysql 1984 7월 16 15:46 ca.pem -rw-r--r-- 1 mysql mysql 1497 7월 16 15:51 client-cert.pem -rw-r--r-- 1 mysql mysql 1679 7월 16 15:51 client-key.pem -rw-r--r-- 1 mysql mysql 989 7월 16 15:50 client-req.pem -rw-r--r-- 1 mysql mysql 1838 7월 16 15:48 server-cert.pem -rw------- 1 mysql mysql 3243 7월 16 15:48 server-key.pem -rw-r--r-- 1 mysql mysql 1671 7월 16 15:47 server-req.pem
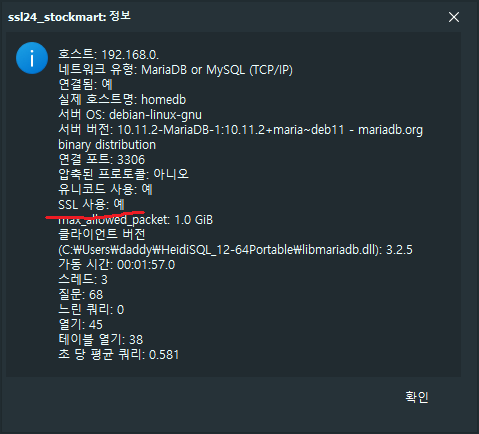
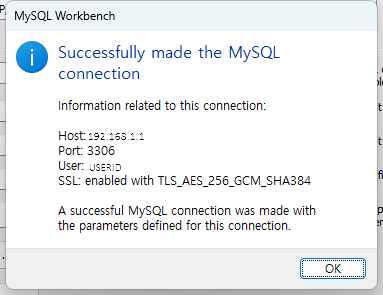
MariaDB [(none)]> status -------------- mysql Ver 15.1 Distrib 10.11.2-MariaDB, for debian-linux-gnu (aarch64) using EditLine wrapper
Connection id: 315 Current database: Current user: root@localhost SSL: Cipher in use is TLS_AES_256_GCM_SHA384 Current pager: stdout Using outfile: '' Using delimiter: ; Server: MariaDB Server version: 10.11.2-MariaDB-1:10.11.2+maria~deb11 mariadb.org binary distribution Protocol version: 10 Connection: Localhost via UNIX socket Server characterset: utf8mb4 Db characterset: utf8mb4 Client characterset: utf8mb3 Conn. characterset: utf8mb3 UNIX socket: /run/mysqld/mysqld.sock Uptime: 6 min 54 sec
Threads: 69 Questions: 2386 Slow queries: 0 Opens: 37 Open tables: 30 Queries per second avg: 5.763 --------------
이 코드는 소스로 쉘에서 실행하거나 Web 기반의 jupyterlab 에서 실행하면 아무 문제이 print 문이 잘 작동하고 출력 결과가 나온다.
1 2
>>> ! python mutiprocess1.py Hello multiproess
print 의 Multiprocessing 에서 문제는 링크 참고1 을 읽어보기를 권한다. 이 글에서는 테스트한 내용을 정리만 했다.
원인
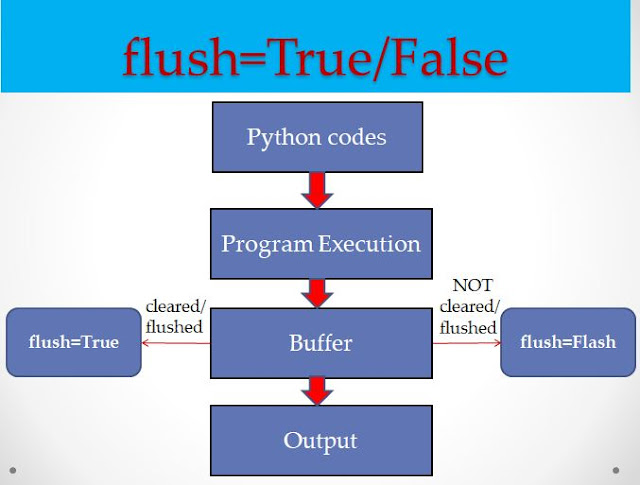
아래 링크 참고1 기사에서 설명을 자세히 하고 있다. 보통 파이썬에서 차일드 프로세스를 시작할 때는 'fork', 'spawn', 'forkserver' 방법이 있다고 한다. 그런데 spawn 으로 차일드 프로세스를 실행하면 std io 출력 버퍼가 자동으로 비워지지 않는다(print는 기본으로 flush가 되지 않는다). 그러다 보니 차일드 프로세스가 종료 하면서 자동으로 gabage collection에 의해 버퍼에 남아 있는 메시지가 사라지는 것이다.
해결 방법
메시지 버퍼가 사라지기 전에 flush 를 한다.
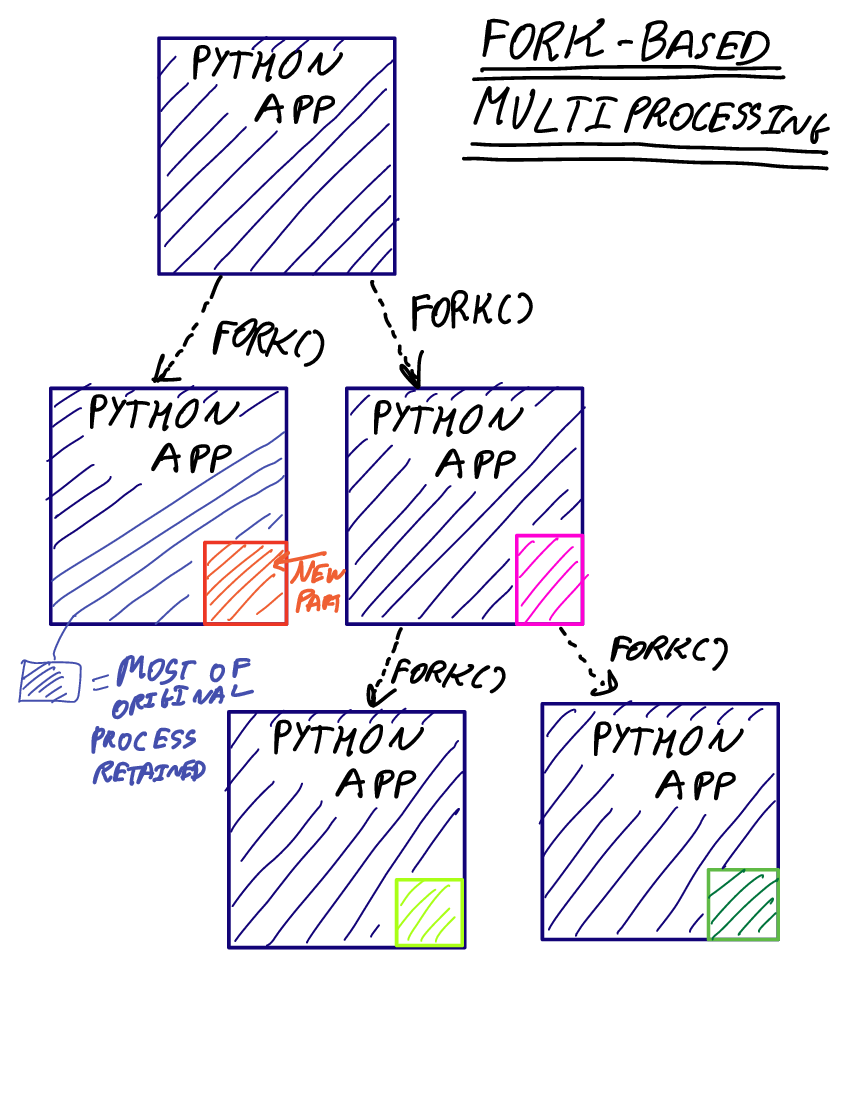
fork 기반의 프로세스를 생성한다.
1. flush 사용
메시지 버퍼가 사라지기 전에 flush 를 한다.
이를 해결하기 위해 모든 print 의 출력은 즉시 flush 되도록 flush=True 옵션을 사용할 수 있다고 한다.
Anaconda / Miniconda 를 설치하고 윈도우즈에서 실행시 바로가기로 사용하는 방법을 정리했다. 모든 Commandline, Powershell 에서 conda 명령을 사용하려면 환경변수 PATH 에 지정을 해야 한다. 이 글에서는 바로가기를 사용하면 PATH 환경변수를 활용하지 않고도 쉽게 사용할 수 있다.
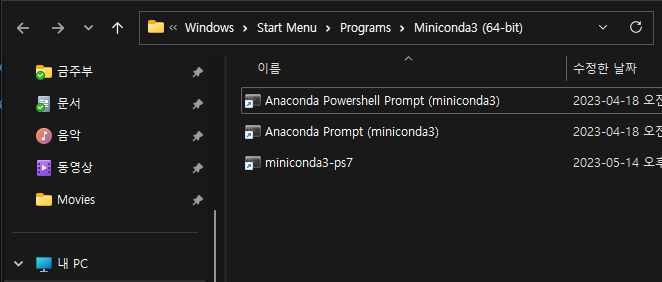
Anaconda/Miniconda 설치 프로그램으로 설치를 하면 바로가기를 만들어 준다. 여기서 힌트를 얻으면 된다.
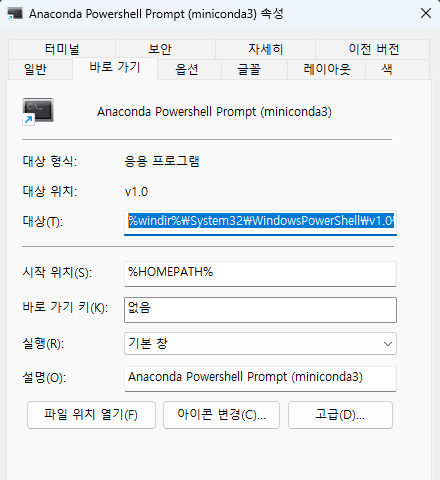
바로가기 속성을 사용해 파워쉘로 conda 환경을 초기화 하기 위해서는 conda-hook.ps1 실행이 필요하다. 설치한 Anaconda 시작프로그램의 속성을 통해 알 수 있다. 보통 설치된 아래 위치에 있다.
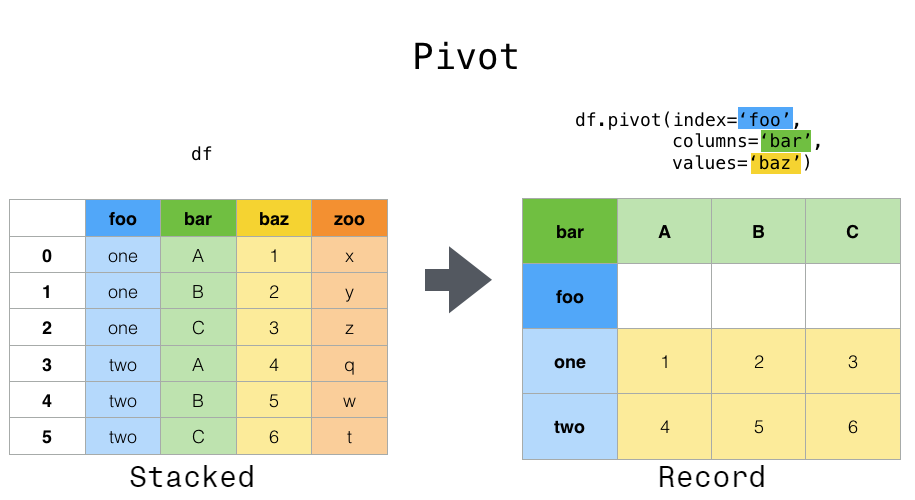
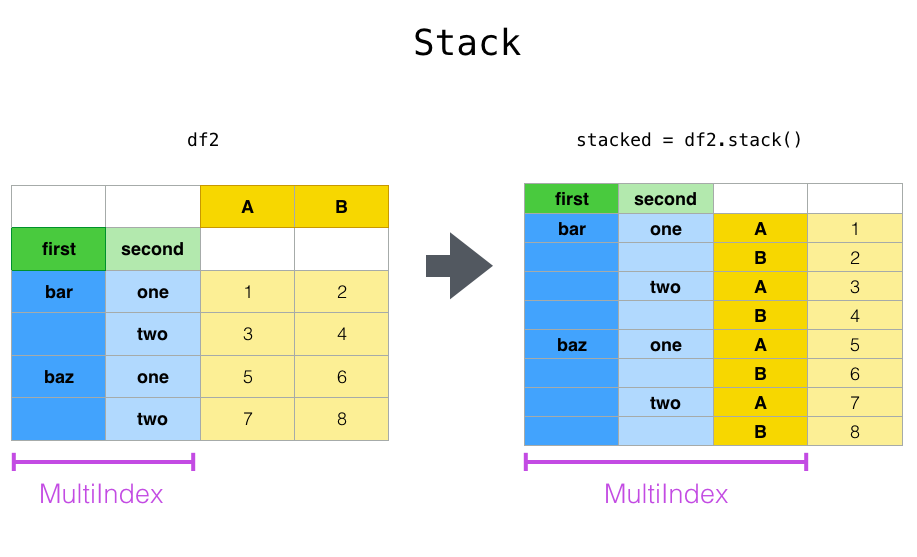
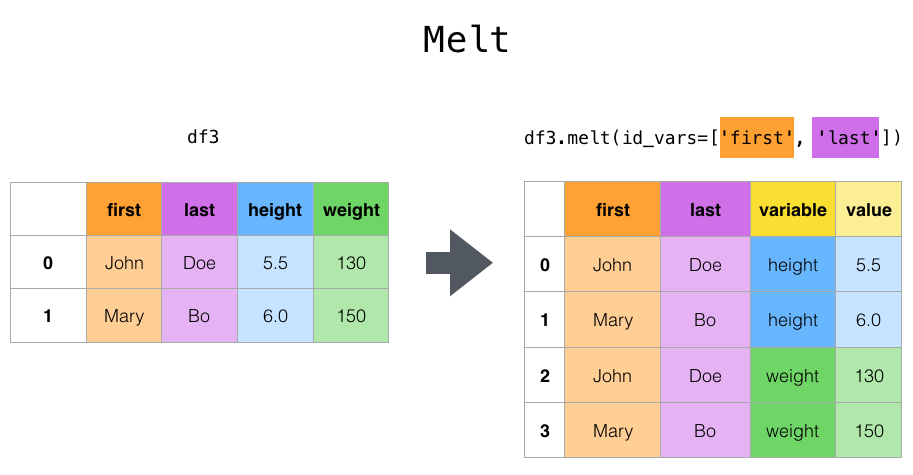
위 데이터는 stack()을 하면 A, B 컬럼이 MultiIndex 로 추가되며 A, B 컬럼 데이터 포인트가 배치된다.
1
df.stack()
first second
bar one A -1.301694
B -0.013259
two A -0.197846
B 0.879890
baz one A 0.718211
B -0.739434
two A -0.140217
B 0.071260
foo one A -1.142268
B -2.606413
two A 1.119145
B 0.109402
qux one A -0.504167
B -1.703280
two A 1.064976
B 1.011060
dtype: float64
1 2
df2 = df[:4] df2
A
B
first
second
bar
one
-1.301694
-0.013259
two
-0.197846
0.879890
baz
one
0.718211
-0.739434
two
-0.140217
0.071260
1 2
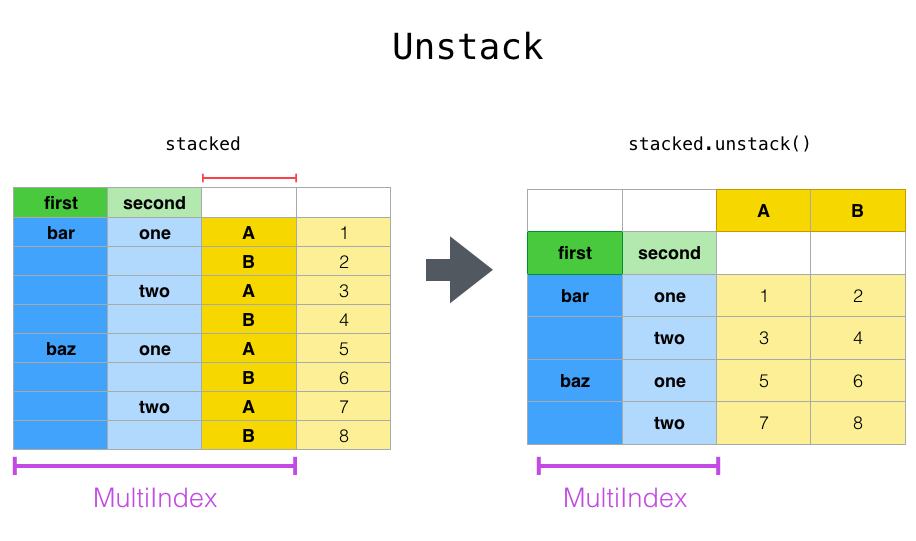
stacked = df2.stack() stacked
first second
bar one A -1.301694
B -0.013259
two A -0.197846
B 0.879890
baz one A 0.718211
B -0.739434
two A -0.140217
B 0.071260
dtype: float64
> with np.printoptions(precision=3): > print( np.array([2.0]) / 3 )
pandas 숫자 출력 형식 변경
pandas에서 몇 가지 옵션을 바꾸는 방법을 정리해 보자. pandas의 옵션은 pd.options 를 사용한다.
pd.options.display
출력의 형태, 표기를 변경하는 것은 pd.options.display 아래에 있다. 여기서 사용할 수 있는 옵션은 describe_option() 으로 확인할 수 있다.
1
2
3
4
5
6
7
> pd.describe_option() compute.use_bottleneck : bool Use the bottleneck library to accelerate if it is installed, the default isTrue Valid values: False,True [default: True] [currently: True] ...
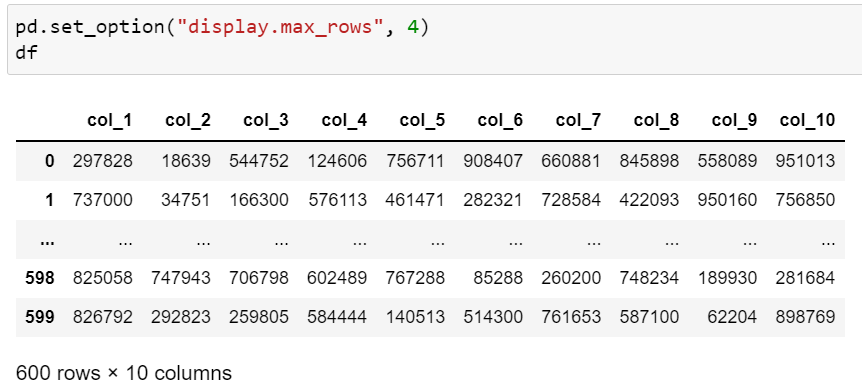
- row, column 출력 개수 조정
pd.options.display.max_rows : 표를 출력할 때 최대 행 수입니다.
pd.options.display.min_rows : 표를 출력할 때 최소 행 수입니다.
1 2 3 4 5
import pandas as pd > pd.options.display.max_rows 60 > pd.options.display.min_rows 10
pd.describe_option(OPTIONS) 를 사용하면 해당 옵션에 대한 설명을 출력해 준다.
1 2 3 4 5
> pd.describe_option("max_rows") display.max_rows : int If max_rows is exceeded, switch to truncate view. Depending on `large_repr`, objects are either centrally truncated or printed as a summary view. 'None' value means unlimited.
[project] name = "example_package_YOUR_USERNAME_HERE" version = "0.0.1" authors = [ { name="Example Author", email="author@example.com" }, ] description = "A small example package" readme = "README.md" requires-python = ">=3.7" classifiers = [ "Programming Language :: Python :: 3", "License :: OSI Approved :: MIT License", "Operating System :: OS Independent", ]
This is a simple example package. You can use [Github-flavored Markdown](https://guides.github.com/features/mastering-markdown/) to write your content.
LICENSE 파일에 저작권을 명시한다.
1
2
3
Copyright (c) 2018 The Python Packaging Authority
Permission is hereby granted, free of charge, to any person obtaining a copy
배포 묶음 생성하기
배포를 위한 build 도구를 설치한다.
1
python3 -m pip install --upgrade build
packaging_tutorial 폴더 아래 pyproject.toml 파일이 있는 위치에서 배포를 위한 build 명령으로 소스를 패키징을 한다.
build 를 수행하면 별도의 venv 가상환경을 생성해서 의존성에 명시된 setuptools 등을 설치하고 빌드를 진행한다.
1 2 3 4 5 6 7
> python3 -m build * Creating venv isolated environment... * Installing packages in isolated environment... (setuptools>=61.0) ... ... removing build\bdist.win-amd64\wheel Successfully built example_package_YOUR_USERNAME_HERE-0.0.1.tar.gz and example_package_YOUR_USERNAME_HERE-0.0.1-py3-none-any.whl
이 명령의 결과로 dist 폴더에 우리 프로젝트에 대한 배포용 패키징으로 소스 패키징 .gz 파일, built distribution 패키징 .whl 2개의 파일이 생성된다.
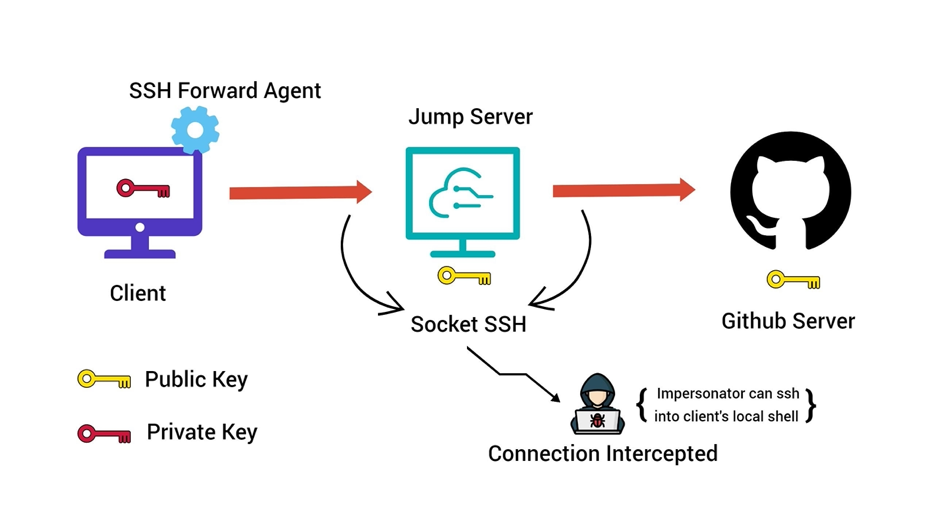
github, bitbucket 같은 클라우드 사이트에 Client 프로그램으로 SSH 접속을 위해서는 SSH 키 쌍 생성하고 클라우드 사이트에 등록해야 한다. 보통 github, bitbucket 등 같은 SSH 접근을 지원하는 사이트는 ssh-agent forwarding 방식을 사용한다.
클라이언트에서 bitbucket 에 SSH 접속이 가능한지 테스트한다. 단, 모든 SSH 연결은 최초 접속시 호스트 접속 여부를 묻는다. 아래 같이 bitbucket.org 접속시 접속 여부를 묻는 다이얼로그가 나온다.
1
2
3
4
5
6
7
8
9
$ ssh -T git@bitbucket.org The authenticity of host 'bitbucket.org (104.192.141.1)' can't be established. ED25519 key fingerprint is SHA256:ybgmFkzwOSotHTHLJgHO0QN8L0xErw6vd0VhFA9m3SM. This key is not known by any other names Are you sure you want to continue connecting (yes/no/[fingerprint])? yes Warning: Permanently added 'bitbucket.org' (ED25519) to the list of known hosts. authenticated via ssh key. You can use git to connect to Bitbucket. Shell access is disabled
결과적으로 아래 같이 결과가 출력되면 성공한 상태다.
1
2
3
authenticated via ssh key.

You can use git to connect to Bitbucket. Shell access is disabled
이제 git 클라이언트에서 HTTPS, SSH 를 통해서 bitbucket 과 ssh 연결이 가능하다. git 클라이언트로 push, pull 등을 수행할 수 있다.


 그림>
그림>


 이미지 참조