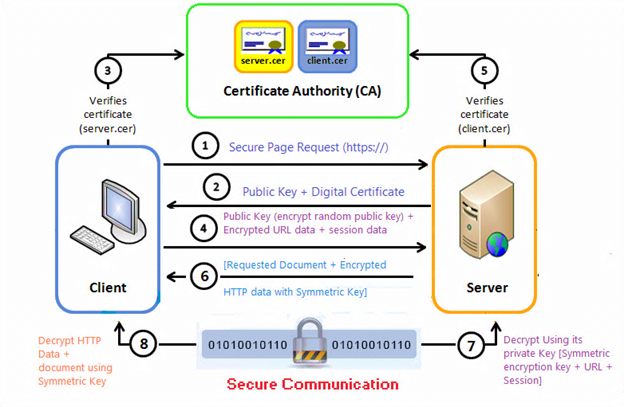
Web server certificates 과정

Securing a web site with a server certificate 단계
- 비밀키를 생성한다.
- 비밀키로 CSR certificate siging requests 을 생성한다.
- CSR 을 CA 로 사인한다.
- 사인한 CERT 를 받고 설치한다.
1. 비밀키를 생성한다.
rsa 를 사용해 4096크기 비밀키를 생성한다.
1
2
3
4
5
|
Generating RSA private key, 4096 bit long modulus (2 primes)
|
Public Key 생성
1
| 명령: openssl rsa -in [private key 파일명] -pubout -out [파일명]
|
2. Create a CSR(certificate signing request) from this key,
인증서 발급을 위한 필요한 정보를 담고 있는 인증서 신청서를 작성한다.
1
| 명령어 : openssl req -new -key [private key 파일명] -out [파일명]
|
비밀키에서 CSR 파일 작성을 요청하면 아래 내용을 묻는다.
인증서 발급을 위한 필요한 정보를 담고 있는 인증서 신청 형식 데이터 이다.
- Country Name (국가코드) KR
- State or Province Name (시/도의 전체이름) Seoul
- Locality Name (시/군/구 등의 이름) Songpa-gu
- Organization (회사이름) XXXX
- Organization Unit (부서명) Server
- Common Name (SSL 인증서를 설치할 서버의 Full Domain) www.xxxx.com
- Common Name 에는 인증서를 설치할 사이트의 도메인의 이름을 넣어야 한다. (ip, port, http, https 포함불가능)
4. CA 인증한 CRT 인증서 만들기
CSR 을 CA에서 인증해 CRT 파일을 생성한다. 여기서는 비밀키와 CSR 요청서를 바탕으로 CRT 인증서를 생성한다.
1
| 명령어 : openssl req -x509 -days [기간] -key [private key 파일명] -in [csr 파일명] -out [파일명] -days [기간]
|
x509 를 이용하고 365일 사용 가능한 crt 인증서를 생성한다.
1
| openssl req -x509 -days 365 -key my_rsa.key -in my_rsa.csr -out my_rsa.crt -days 365
|
생성한 혹은 CA에서 받은 CRT 파일은 아래 같이 확인해 볼 수 있다.
1
| openssl x509 -text -in yourdomain.crt -noout
|
5. CRT 파일을 PEM 파일로 변환한다.
1
| openssl x509 -in mycommoncrt.crt -out mycommonpem.pem -outform PEM
|
[Tip] 인증서 Config 파일 (test.conf)
위에서 만들다 보면 계속 같은 내용을 써야 한다. 그래서 그 부분을 파일로 만들어 놓고 csr, crt 생성할때 사용하면 된다.
1
2
3
4
5
6
7
8
9
10
11
12
13
14
15
16
17
18
19
20
21
22
| [req]
default_bits = 2048
prompt = no
default_md = sha256
req_extensions = req_ext
distinguished_name = dn
[dn]
C=KR
ST=Seoul
L=Seoul
O=COMPANY
OU=DEV
emailAddress=test@test.com
CN = testmachine
[req_ext]
subjectAltName = @alt_names
[alt_names]
IP.1 = 111.111.111.111
DNS.1 = test.com
|
csr 을 생성한다.
1
| openssl req -new -key private.key -out private.csr -config test.conf
|
csr, crt 파일을 생성한다.
1
| openssl req -x509 -days 365 -key private.key -in private.csr -out mycommoncrt.crt -days 365 -config test.conf
|
그리고 이렇게 해서 인증서를 만들었을때 subjectAltName 이 안들어간다 . 그 부분이 필요할 경우에는 이렇게 명령어를 사용하면 된다.
1
| openssl req -x509 -days 365 -key private.key -in private.csr -out mycommoncrt.crt -days 365 -config test.conf -extensions req_ext
|
openssl 팁 몇가지
CRT 파일 확인
openssl x509 -text -noout -in <인증서파일> : 인증서 내용을 볼수 있다.
Verifying Your Keys Match
1
2
3
| openssl pkey -pubout -in .\private.key | openssl sha256
openssl req -pubkey -in .\request.csr -noout | openssl sha256
openssl x509 -pubkey -in .\certificate.crt -noout | openssl sha256
|
NGINX 웹 서버 TLS 암호화 추가
개인키와 TLS 인증서 crt 파일을 사용한다.
1
2
| $ sudo mkdir /etc/nginx/tls/private
$ mv my_rsa.key my_rsa.crt /etc/nginx/tls/private
|
- 개인 키는 /etc/nginx/tls/private/my_rsa.key 파일에 저장됩니다.
- 개인 키 및 CSR(인증서 서명 요청) 생성 및 CA(인증 기관)에서 인증서 TLS 인증서는
- /etc/nginx/tls/private/example.com.crt 파일에 저장됩니다.
1
2
3
4
5
6
7
| server {
listen 443 ssl;
server_name www.thinkbee.kr;
root /home/qkboo/Home/www/thinkbee.kr/;
ssl_certificate /etc/nginx/tls/private/my_rsa.crt;
ssl_certificate_key /etc/nginx/tls/private/my_rsa.key;
}
|
참고
- Howto – Install a self signed web server certificate
- openssl quick reference guide
- Openssl로 SSL 을 위한 인증서 발급하기 (HTTPS),blog
- Nginx - HTTPS and Certificate SSL,blog
- NodeJS와 Nginx 웹 서버,blog
