CUDA on WSL User Guide
2021/12/05 일 현재
1. WSL 이란
네이티브 리눅스 앱을 Windows 11 and later OS build 에서 실행할 수 있는 Windows Subsystem for Linux 이다.
WSL 1 vs. WSL 2
WSL2 is the second generation of WSL that offers the following benefits:
Linux applications can run as is in WSL2. WSL 2 is characteristically a VM with a Linux WSL Kernel in it that provides full compatibility with mainstream Linux kernel allowing support for native Linux applications including popular Linux distros.
Faster file system support and that’s more performant.
WSL 2 is tightly integrated with the Microsoft Windows operating system, which allows it to run Linux applications alongside and even interop with other Windows desktop and modern store apps.
2. NVIDIA GPU Accelerated Computing on WSL 2
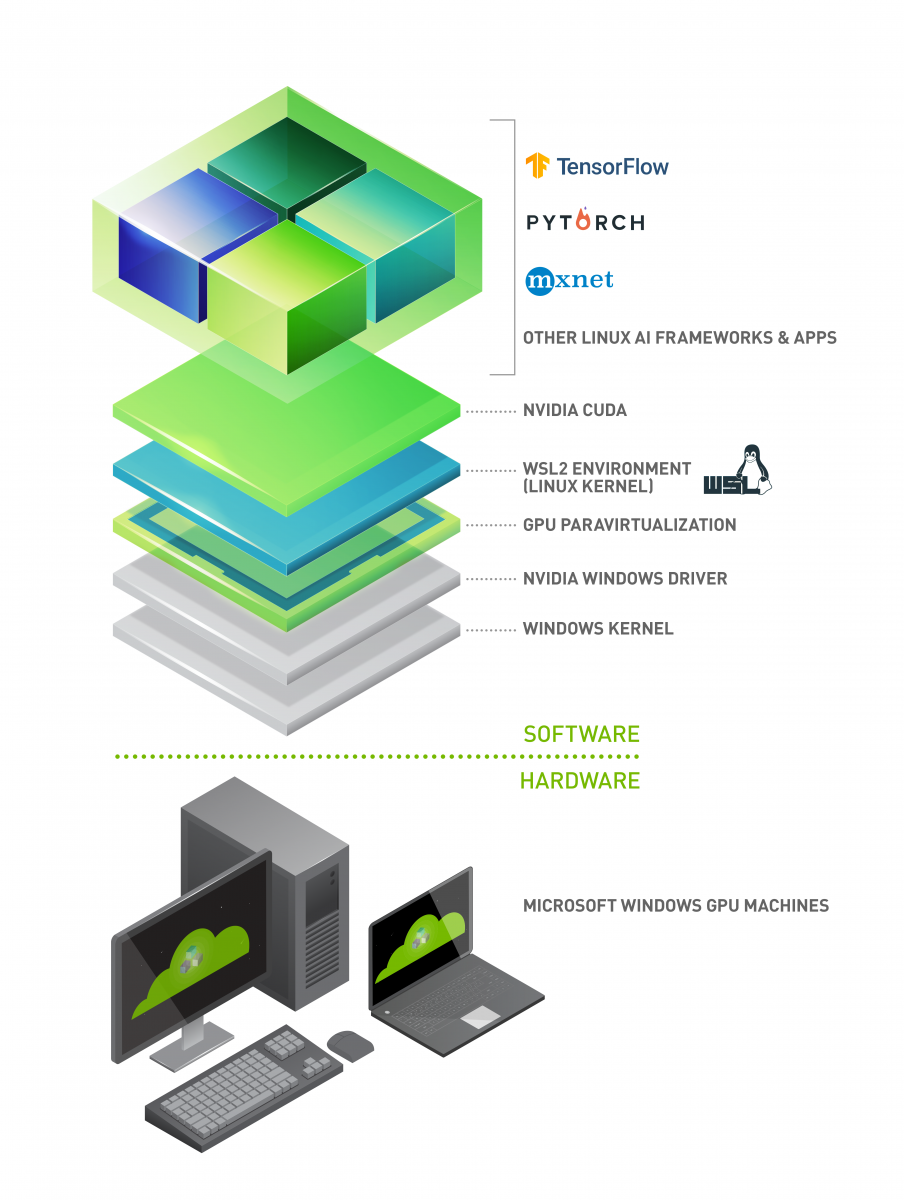
WSL 2에서 마이크로소프트는 NVIDIA CUDA 및 기타 컴퓨팅 프레임워크와 기술과 함께 데이터 과학, 머신러닝 및 추론 솔루션을 위한 GPU 가속 컴퓨팅을 가능하게 하는 GPU 반가상화 기술을 도입했다. WSL 유사 환경 또는 WSL 2에서 CPU 개입을 줄이면서 GPU에서 더 많은 병렬 작업을 파이프라인으로 수행할 수 있으므로 거의 네이티브에 가까운 성능을 제공한다. NVIDIA 드라이버 지원은 CUDA 및 관련 컴퓨팅 소프트웨어 스택에서 멈추지 않습니다. 다이렉트 ML 지원과 함께 DX12 API를 지원하여 WSL 2에서 그래픽을 활성화하는 DirectX 지원이 있습니다.
Illustration of the possibilities with NVIDIA CUDA software stack on WSL 2
3. WSL2 시작
WSL2 요구사항
- Geforce, Quadro 제품 계열에서 Pascal 또는 최신 GPU 구조를 WDDM모드로 SKU를 사용할 수 있다.
- 최신 WSL 커널 로 5.10.16.3 이상을 권장한다. (최소 4.19.121+ 이상)
- Windows 11 에서는 윈도우 인사이더 프로그램 가입이 필요 없다.
- Windows 10 에서는 윈도우 인사이더 프리뷰 프로그램이 필요하다.
Step 1: Install NVIDIA Driver for GPU Support
윈도우 11 그래픽 드라이버로 NVIDIA GeForce Game Ready or NVIDIA RTX Quadro 를 설치한다.
- https://developer.nvidia.com/cuda/wsl
- Do not install any Linux display driver in WSL.
3.3. Step 2: Install WSL 2
윈도우 터미널 / 커맨드 라인 / 파워쉘 에서 WSL을 설치
1 | wsl.exe --install |
Ensure you have the latest WSL kernel:
1 | wsl.exe --update |
3.4. Setting Up a Linux Development Environment
기본으로 WSL2는 Ubuntu 가 설치되어 온다. 다른 배포본은 MS store에서 설치. wsl 시작.
1 | wsl.exe |
업데이트를 위한 WSL 명령:
- https://docs.microsoft.com/en-us/windows/wsl/install
- https://docs.microsoft.com/en-us/windows/wsl/basic-commands
4. Getting Started with CUDA on WSL 2
WSL2에서 CUDA 를 지원하려면 CUDA Toolkit이 설치되고 cuDNN도 설치해야 한다.
4.1 WSL에서 CUDA Toolkit을 설치한다
WSL 2 에서 CUDA application을 실행하려면 CUDA toolkit for Linux 를 설치해야 한다.
CUDA Toolkit 11.5 를 다운로드하고 설치한다.
1 | wget https://developer.download.nvidia.com/compute/cuda/repos/wsl-ubuntu/x86_64/cuda-wsl-ubuntu.pin |
4.2 cudnn 설치
CUDA Toolkit 버전에 대응하는 cuDNN 을 설치해야 한다.
https://docs.nvidia.com/deeplearning/cudnn/install-guide/index.html#install-linux
11.5 는 최신 cuDNN8.3 을 설치한다.
1 | sudo apt install libcudnn8 |
4.3 CUDA 애플리케이션
윈도우에 CUDA 애프리케이션이 있아면 다음 같이 WSL에서 실행해 보자
1 | $ cd /mnt/c/Users/<username>/Desktop |
1 | (tf25gpu_p39)~$ nvidia-smi |
4.4 Building CUDA Samples
CUDA 샘플을 빌드해서 실행해 보자.
1 | (tf25gpu_p39)/usr/local/cuda-11.5/samples/4_Finance/BlackScholes$ ./BlackScholes |
참고
CUDA Toolkit 버전에 대응하는 cuDNN 을 설치해야 한다.
Tensforflow on WSL2: https://rosypark.tistory.com/313