2017-09-17: 최초 작성
{:.right-history}
Synergy
Synergy는 키보드와 마우스 자원을 공유할 수 있는 클라이언트 서버 프로그램이다.
 {:width=”600”}
[그림. Synergy 통한 결합 (symless.com)]
2017-09-17: 최초 작성
{:.right-history}
Synergy는 키보드와 마우스 자원을 공유할 수 있는 클라이언트 서버 프로그램이다.
{:width=”600”}
[그림. Synergy 통한 결합 (symless.com)]
Raspberry Pi 3 64bit OS openSUSE LEAP 15: Install
2017-10-30: swap 추가, timezone 수정
{:.right-history}
Opensuse 에서 Raspberry Pi 3를 위한 64bit OS openSESE Leap 42.2 을 제공하고 있다.
이글은 5개 글타래로 구성되며, openSUSE 설치 및 사용에 대해 작성한다.
raspbian-wheezy에는 Python 2.7과 Python 3.2가 설치되어 있습니다.
파이썬으로 개발하며 필요한 도구를 설치해서 사용하면 좋습니다. 파이썬 패키지 관리 도고, 가상 개발 환경 등의 설치를 통해서
라즈비안에서 사용하는 파이썬 패키지들은 apt를 이용해서 라즈비안 저장소의 다양한 패키지를 사용할 수 있습니다. apt로 파이썬 패키지를 설치해 사용할 수 있는데 Python 2.x와 Python 3.x의 호환을 위해서 Python 2.x는 ‘python-‘ 접두어를 사용하고 Python 3.x 패키지들은 ‘python3-‘ 를 사용합니다.
예를 들어 picamera 패키지는 python-picamera와 Python 3.x 버전을 위해서 python3-picamera가 있습니다.
기본 개발자 모듈이 설치 안되어 있다면 설치한다.
1 | $ sudo apt install build-essential |
Python 개발을 위해서는 리눅스에 파이썬 헤더가 필요하다. 그래서 python-dev 패키지를 설치해 준다.
Jessie에서 Python3.4 헤더는 설치가 되어 있다.
1 | $ sudo apt-get install python3-dev |
python2 개발환경을 위해서 헤더를 설치하려면
1 | $ sudo apt install python-dev |
전통적인 파이썬 패키지 도구인 PIP(Python Package Index, PyPI)를 이용하면 폭넓게 범위를 넓힐 수 있습니다.
Raspbian Jessie : 기본으로 제공
apt를 이용해 저장소에 있는 외부 패키지를 설치해 사용할 수 있습니다. 그렇지만 개발에 필요한 모든 패키지가 라즈비안 저장소에 있지 않거나 오래된 버전일 수 있습니다.
Python2.x용 pip는 python-pip를 설치하고 Python3.x pip는 python-pip3 를 설치합니다.
1 | $ sudo apt-get install -y python-pip |
혹은 pip를 최신 소스로 부터 직접 설치하려면 다음같이 실행합니다.
1 | $ wget https://bootstrap.pypa.io/get-pip.py |
시스템에 설치된 python 버전 마다 sudo로 pip를 설치애야 합니다. Python3 을 위한 pip를 설치한다.
1 | $ sudo python3 get-pip.py |
다음은 Python2를 위한 pip를 설치합니다.
1 | $ sudo python2.7 get-pip.py |
Raspbian에서 사용자 계정에서 pip 설치하면 퍼미션 에러가 발생한다.
OSError: [Errno 13] Permission denied: ‘/usr/local/lib/python2.7/dist-packages/pip-7.1.2.dist-info’
sudo 명령으로 설치해야 한다.
https://pip.pypa.io/en/latest/installing.html
http://stackoverflow.com/questions/6587507/how-to-install-pip-with-python-3
슈퍼사용자로 pip 설치시 사용자 계정에서 사용하기 불편한 점이 많다. 그래서 가상 개발환경을 구성해 사용자 계정에서 제약없이 사용하도록 한다.
pyhthon2, python3 버전이 설치되어서 pip도 역시 해당 버전이 별도로 설치되어 있습니다. 다음 버전 저보를 출력하면 어떤 버전인지 확인이 가능합니다.
1 | $ pip3 --version |
특정 파이썬 버전의 패키지 모듈을 설치한다면 해당 pip 버전을 호촐하는게 정확합니다.
pip 는 다음 같이 업그레이드 해야 합니다.
1 | $pip install -U pip |
On Windows [5]:
1 | $python -m pip install -U pip |
다양한 파이썬 버전을 위해 환경 구성을 해주는 유틸리티.
pyenv : “Simple Python Version Management”, 로컬에 다양한 파이썬 버전을 설치하고 사용할 수 있도록 한다. pyenv를 사용함으로써 파이썬 버전에 대한 의존성을 해결할 수 있다.
virtualenv : “Virtual Python Environment builder”, 로컬에 다양한 파이썬 환경을 구축하고 사용할 수 있도록 한다. 일반적으로 Python Packages라고 부르는 ( pip install을 통해서 설치하는 ) 패키지들에 대한 의존성을 해결할 수 있다.
virtualenv와 virtualenvwrapper를 사용할 것이다.
여기서는 virtualenv를 설치하고 virtualenvwrapper를 사용해서 모듈을 설치하고 관리한다. 그러기 위해서 먼저 시스템의 기본 /usr/bin/python 버전을 확인하고 해당 버전의 pip 모듈을 사용해서 virtualenv 와 virtualenvwrapper 를 설치한다.
virtualenv는 가상의 파이썬 작업환경을 만들어 준다. 작업환경을 따로따로 만들어주면 해당 환경 내의 파이썬으로 무슨 짓을 해도 시스템 파이썬이나 다른 가상의 작업환경에게 영향을 주지 않는다.
pip로 설치할 수 있습니다.
pip는 시스템의 site-packages 폴더에, /usr/lib/python2.7/site-packages에 모듈을 설치한다. virtualenv를 이용하면 분리할 수 있다.
단, 현재 python2.7과 python3.4가 공존하는 상태에서 virtualenv는 python2.x를 기반으로 만들어 져서 /usr/bin/python을 찾는데 그래서 다음 같이 pip2 버전으로 virtualenv를 설치해 준다.
1 | $ pip install virtualenv |
virtualenv는 python 버전에 관계 없이 하나만을 설치해 두면 된다.
virtualenvwrapper는 virtualenv 통합 환경을 좀 더 쉽게 접근할 수 있도록 도와줍니다. ‘virtualenv’ 가 설치된 글로벌 사이트 패키지 위치에 설치되야 합니다. 아마 관리자 권한이 필요할 것입니다.
라즈비안에서는 sudo로 설치해 주어야 한다. 다름 같이 pip로 설치합니다.
1 | $ sudo pip install virtualenvwrapper |
이제 일반 사용자 환경에서 python 개발환경을 구축해 보자.
쉘 (.bashrc, .profile, 등)에 다음 라인을 추가합니다.
1 | export WORKON_HOME=$HOME/.virtualenvs |
그리고 쉘 환경을 로딩하기 위해서 다시 로그인 하거나 다음 같이 source 명령을 이용해도 좋습니다.
1 | $ source .profile |
다음 에러가 발생하면 쉘에 VIRTUALENVWRAPPER_PYTHON 를 추가해 준다.
/usr/bin/python: No module named virtualenvwrapper
virtualenvwrapper.sh: There was a problem running the initialization hooks.If Python could not import the module virtualenvwrapper.hook_loader,
check that virtualenvwrapper has been installed for
VIRTUALENVWRAPPER_PYTHON=/usr/bin/python and that PATH is
다음 같이 virtualenvwrapper 를 사용할 수 있습니다.
1 | $workon |
1 | $ mkvirtualenv -p python2 raspberrypi2 |
1 | (raspberrypi2):~$ deactivate |
1 | (raspberrypi2)$pip install rpi.gpio |
이제 이 디렉토리 밑에서 코드 작업을 하고 사용하면 됩니다.
1 | $ mkvirtualenv -p python3 rpi_py3 |
위의 설명과 같이 고립된 작업환경을 만들려면 디렉토리 구조를 잘 구성해야 합니다. 다음 같이 라즈베리파이 프로그램을 작업할 ‘Blinke’ 디렉토리를 만듭니다. Blinken은 LED를 깜박이는 작업을 수행할 것입니다.
1 | $mkdir blinken |
마지막 명령으로 가상환경을 활성화시키면 프롬프트 앞에 (env)가 표시됩니다. 가상환경을 바탕으로 환경 설정이 동작한다는 것을 의미합니다. 이제 필요한 파이썬 패키지 및 프로그램을 설치하고 개발을 할 수 있습니다.
1 | $ mkdir django_tests |
다시 시스템 파이썬으로 복귀하고 싶으면 deactivate를 실행합니다.
1 | (env)$ deactivate |
1 | $ sudo python3 get-pip.py |
python3의 virtualenvwrapper를 설치한다.
1 | $ sudo pip3 install virtualenvwrapper |
mkvirtualenv에서 python3의 환경을 하나 설치한.다.
1 | $ mkvirtualenv -p python3 rpi_py3 |
cpvirtualenv oldenv newenv
rmvirtualenv oldenv
3.3에서부터 pyvenv에 기본으로 설치되어 있다. 다만 3.3에서는 pip를 가상 환경을 만들 때마다 설치해주어야 한다. 3.4에서는 pip까지 기본으로 설치되어 있다.
1 | $ mkdir django_tests |
파이썬을 이용하면 시스템 관련 정보를 활용할 수 있습니다.
cpuinfo를 살펴보면 현재 라즈베리파이 모델을 확인할 수 있습니다.
1 | $cat /proc/cpuinfo |
출력 결과에서 Revision을 살펴보면 라즈페리파이 모델을 확인할 수 있습니다. 이 리비전 번호를 다음 링크의 테이블에서 찾아 보면 확인이 가능합니다.
1 | $ python |
- 2017-07-14: 윈도우에서 session 관리
- 2017-07-10: tmux copy & paste
{:.right-history}
터미널 명령은 $ tmux 로 표현하고, Tmux window 에서 Prefix key 키 조합은 는 C{:.keyword} 표기하고, Meta key인 Alt는 M{:.keyword}으로 표기한다 - Tmux Start 참조.
2026-05-29: 내용 문맥 조정
2017-07-10: tmux-continum 추가
Tmux는 terminal multiplexer로 서버에 여러 프로그램을 세션에 저장하고, 다른 작업 혹은 연결을 끊었다 다시 접속해서 세션을 열어 작업을 이어갈 수 있다.

[그림. Tmux 실행 모습 (tmux.github.io)]
여기서는 tmux 2.x, 3.x 에도 적용할 수 있다.
brew 를 사용한다.Tmux 설치
혹시 모르니 기존 낮은 버전의 tmux를 삭제하고 시작해 보자.
1 | $ sudo apt remove --purge tmux |
소스를 https://github.com/tmux/tmux/releases/ 에서 최신 버전으로 다운로드 하고 빌드한다.
1 | sudo apt update |
단, libtinfo5 6.x 설치시 의존성 라이브러리 문제로 패키지 삭제 문제 발생!!!
https://launchpad.net/ubuntu/yakkety/amd64/tmux/2.2-3 에 빌드되어 있는 바이너리를 Ubuntu 14.04 설치하기 위해서 다음 패키지 버전이 필요하다.
Depends on:
기본 설치후 업그레이드를 했다면 libc6 버전은 문제가 없는듯.
1 | $ sudo apt-cache show libc6 |
Ubuntu14.04.4 LTS 버전의 libtinfo5는 5.9로 다음 같이 설치해 준다.
1 | $ wget http://launchpadlibrarian.net/271601076/libtinfo5_6.0+20160625-1ubuntu1_amd64.deb |
그리고 tmux 2.2 버전의 deb 를 다운로드한다.
1 | $ wget http://launchpadlibrarian.net/263289132/tmux_2.2-3_amd64.deb |
설치
1 | $ sudo dpkb -i libtinfo5_6.0+20160625-1ubuntu1_amd64.deb |
이제 tmux 명령으로 다중 터미널 명령을 사용할 수 있다.
homebrew를 사용해서 tmux를 설치한다. 2017년 현재 2.4 버전이 설치된다.
1 | $ brew install tmux |
이제 tmux 명령으로 시작할 수 있다.
tmux 를 시작하면 하나의 세션에 하나의 윈도우가 만들어 진다.
1 | $ tmux # 세션을 시작하고 참가한다. |
세션에 참가하면 하나 혹은 그 이상의 윈도우에서 Pane을 배치해 사용할 수 있다.
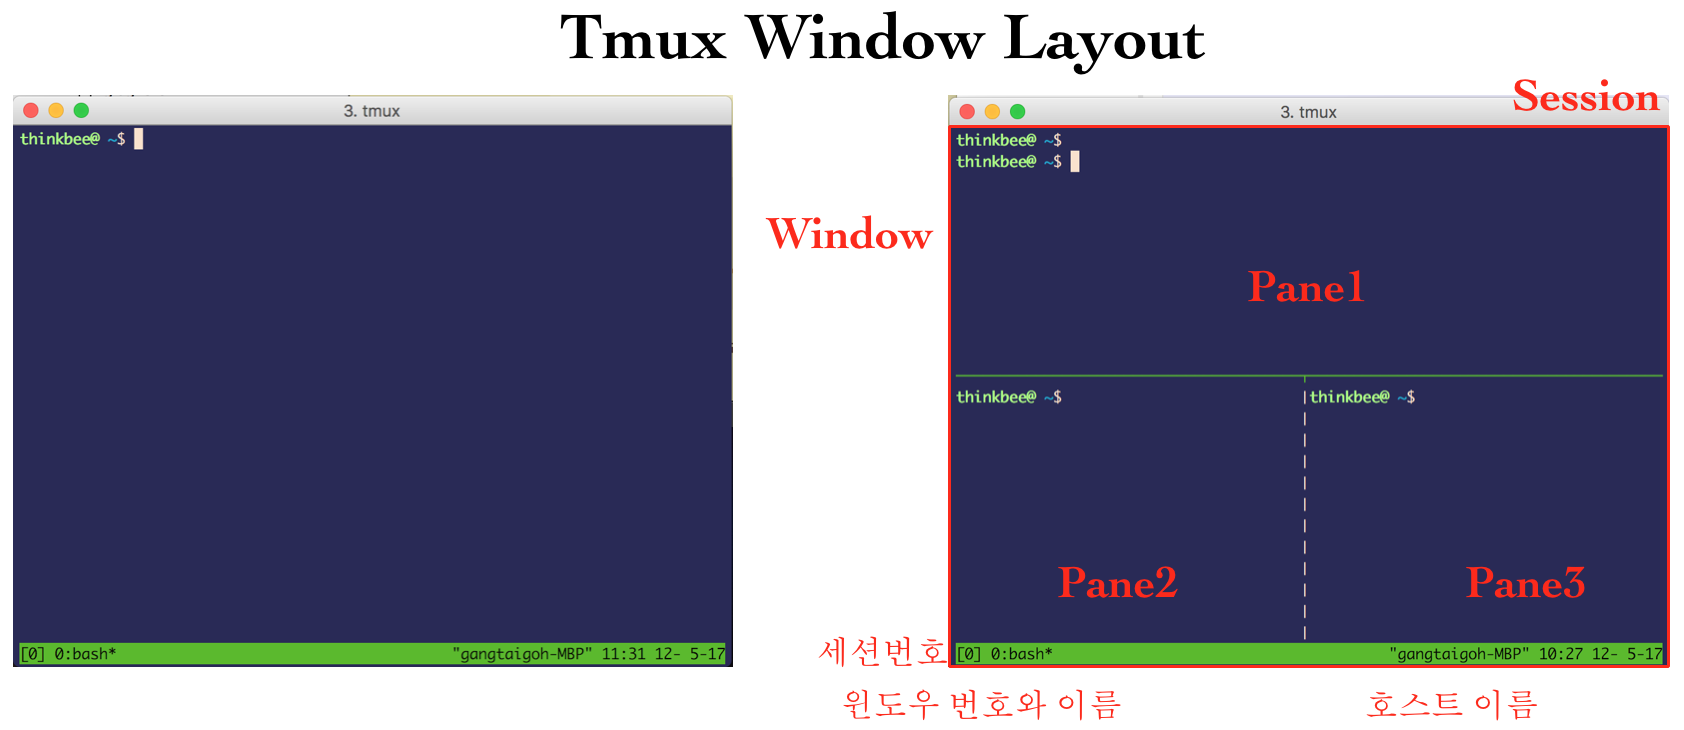
[그림. Tmux window layout]
Tmux 세션 참가후 Window에서는 Prefix key로 Session, Window, Pane 관련 명령을 키로 조합해 사용한다. 기본 Prefix key는 Control+b key고 옵션으로 사용하는 Meta key는 Alt 키 이다.
여기서 Prefix key는 C와 조합으로 표기하고, Meta key인 Alt는 M으로 표기한다.
윈도우 명령 control, meta 키 조합과 병행해 윈도우에서 명령모드를 사용할 수 있다. 명령모드는 C-: 키로 시작하고, 명령모드에서 명령 자동 완성을 지원한다.
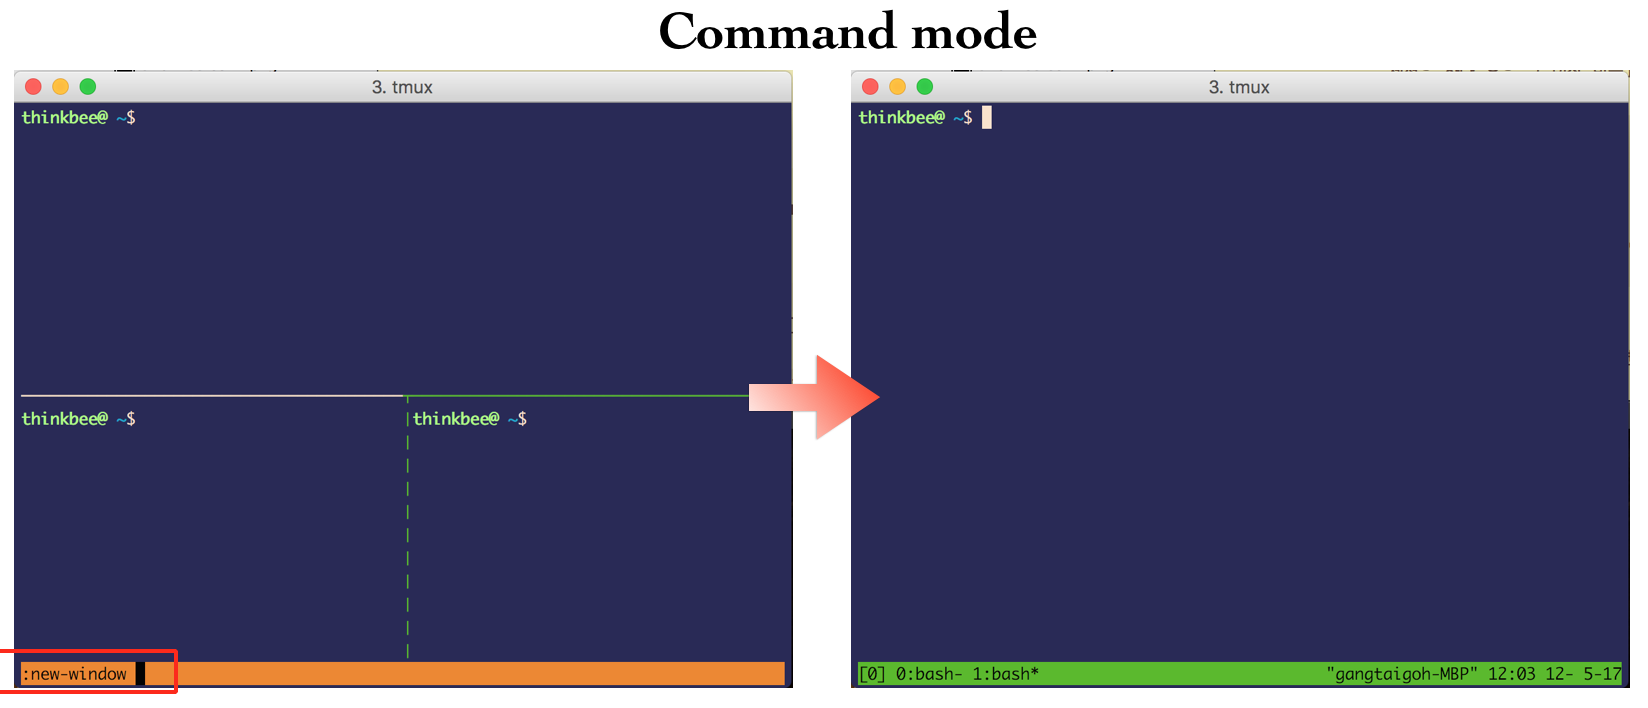
[그림. Window command mode]
윈도우는 수직/수평으로 구획을 나눌수 있다. C-“ 키로 현재 Pane 아래에 수평으로 새 Pane을 나눈다. 그리고 **C-%**키로 수직으로 새 Pane을 나눌 수 있다.

[그림. Tmux Window Pane]
Pane을 지우려면 터미널 exit 명령 혹은 C-x 키로 빠져 나올 수 있다.
윈도우는 명령모드에서 new-window 혹은 C-c 키로 새 윈도우를 추가할 수 있다.
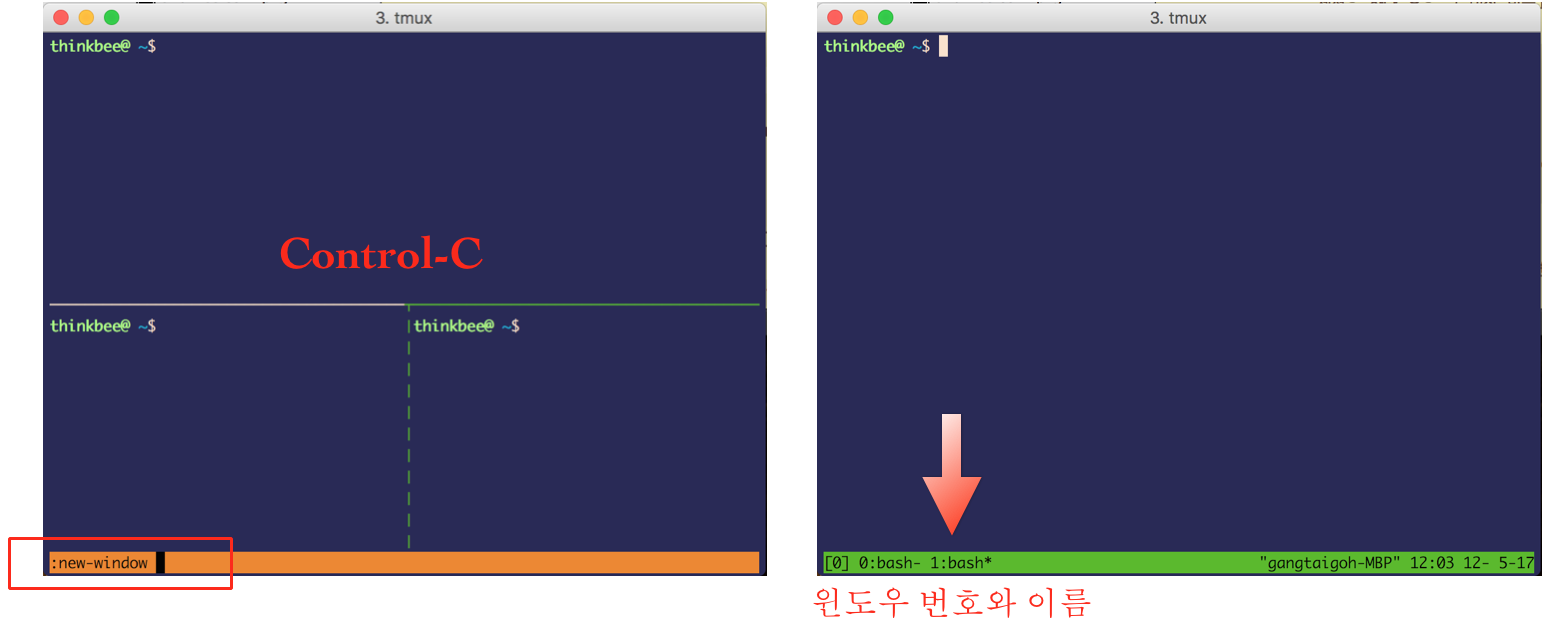
[그림. new Window ]
윈도우 사이의 이동은 윈도우 번호에 따라 단축키 C-0,1,2…9를 사용하거나 C-w로 윈도우 목록에서 선택해 이동할 수 있다.
세션 사용중에 세션을 빠져 나오려면 C-d 로 detach 하거나, 명령모드 C-:에서 detach 명령을 준다.
Tmux 화면 버퍼는 한 화면분 밖에 안되서, 이전 화면 내용을 보려면 스크롤 기능을 켜야 한다. C+[ 키는 스크롤 키고, 우측상단에 페이지 표시가 나타난다. 키보드 방향키나 Page Up/Down키로 스크롤이 가능하다.
세션은 하나 혹은 그 이상 만들고 attach 명령으로 세션에 참가할 수 있다.
1 | $ tmux new -s foo -d # 세션 foo를 시작하고 빠져나온다. |
터미널에서 세션에 참가하려면 attach 명령과 대상 세션을 지정해 준다. 대상 세션은 tmux ls 명령에 표시되는 세션번호 혹은 세션이름을 지정한다.
1 | $ tmux attach |
세션을 완전히 종료 시키려면, tmux 세션에서 명령모드 C-: 에서 kill-session 명령을 실행한다.
혹은 다른 터미널에서 세션번호 혹은 세션 이름으로 종료한다.
1 | $ tmux kill-session -t 3 # 세션번호 3을 종료한다. |
사용자 홈디렉토리에 .tmux.conf 파일에 tmux에 대한 설정을 명시할 수 있다.
Capslock키를 Control 키로 대체해 사용하면, Control+a 키 조합이 편하다. .tmux.conf 에 키 조합을 변경한다.
1 | #Control+a에 'prefix' 연결 |
위에서 prefix는 C-a 로 재배치된다.
1 | # Toggle mouse on with META m |
Tmux Pluin Manager 를 설치하고, tmux 기능을 확장할 수 있다.
먼저 사용자 홈 디렉토리에 저장한다.
1 | $ git clone https://github.com/tmux-plugins/tpm ~/.tmux/plugins/tpm |
다음 설정을 tmux.conf 에 저장한다.
1 | # List of plugins |
플러그인 설치를 위해서 C-I (대문자) 를 실행
플러그인 업그레이드를 위해서 C-U 를 실행
tmux-resurrect{:.keyword}는 tmux 세션을 백업/복구 할 수 있는 플러그인이다. tmux.conf에 다음을 추가
1 | set -g @plugin 'tmux-plugins/tmux-resurrect' |
플러그인 설치를 위해서 C-I 를 실행하면 설치를 시작한다.
Resurrection 플러그인으로 백업/복구하는 키는 다음 같이 지정되어 있다:
tmux-resurrect{:.keyword} 에서 저장한 환경을 자동으로 저장/복구할 수 있는 플러그인이다.
tmux-continuum{:.keyword} 의 주요 기능은:
.tmux.conf 파일에 아래 플러그인을 추가:
1 | set -g @plugin 'tmux-plugins/tmux-resurrect' |
tmux 에서 플러그인 설치를 위해서 C-I (대문자) 를 실행
그리고 .tmux.conf 파일에 continuum-restore 을 on으로 해준다.
1 | set -g @continuum-restore 'on' |
tmux 세션을 모두 나와서 tmux 서버를 모두 kill-session 같은 명령으로 종료시킨후 tmux를 다시 시작하면 .tmux/resurrect 에 저장된 마지막 세션이 복구되는 것을 확인할 수 있다.
이제부터 15분 마다 자동 저장하고 서버를 재시작한 후에 tmux를 다시 시작하면 저장한 환경을 자동으로 복구해 준다.
tmux-continuum 의 상태를 tmux status line에 표시할 수 있다.
1 | set -g status-right 'Continuum status: #{continuum_status}' |
tmux-continuum 은 Linux systemd, macOS 에서 자동 시작을 지원한다.
Linux는 .tmux.conf 파일에 다음 부트 옵션을 추가한다.
1 | set -g @continuum-boot 'on' |
그리고 현재 실행중인 세션에 변경한 설정을 적용하려면
1 | $ tmux source-file ~/.tmux.conf |
.tmux.conf 파일에 다음 부트 옵션을 추가한다.
1 | set -g @continuum-boot 'on' |
그리고 현재 실행중인 세션에 변경한 설정을 적용한다.
1 | $ tmux source-file ~/.tmux.conf |
맥이 재시작 하면 자동으로 Terminal.app 이 실행된다. 터미널 크기는 다음 옵션으로 지정한다:
1 | set -g @continuum-boot-options 'fullscreen' # terminal window will go fullscreen |
tmux 로 서버를 하나 시작하고, tmux -S /tmp/foo 같이 다른 소켓을 사용했다고 자동 저장/복구가 별도로 진행되지 않는다. [^10]
여기까지 설정한 내용은 qkboo/tmux.conf gist 에서 확인 가능.
tmux 설정을 위힌 default 파일이 존재하지 않는다는 점이다. 그래서 tmux 기본 설정을 어딘가 추출해서 보관해두면 다시 돌아오는데 편리하다. 현재 tmux에 설정된 값은 다음 명령어로 추출할 수 있다.
1 | $ tmux show -g | sed 's/^/set-option -g /' > ~/.tmux.current.conf |
tmux.conf를 적용하는 명령은 source-file이다.
1 | $ tmux source-file ~/.tmux.current.conf |
Ubuntu/Debian ARM Cross compile 환경
이 글은 우분투, 리눅스 박스에서 GNU ARM Cross compiler 를 설치하고 관리하는 방법을 다루고 있다.
2018-05-17: sidebar.nav/linux 사용
{: .right-history}
우분투/데비안 리눅스에서 제공하는 ARM Toolchain 환경은 Linaro 툴체인을 바탕으로 만들어져 있어서 두가지 버전으로 제공된다. Hard Float을 지원하는 버전과 그렇지 않은 버전이다.[^1]
find 명령에서 자주 사용하는 쓰임새를 요약했다.
2018-05: rm, i-node 내용 추가
{:.right-history}
주어진 이름으로 찾아 화면에 출력한다. -name 은 대소문자 구분한 이름을 준다.
1 | find ./ -name '*.xml' -print |
주어지는 이름의 패턴은 *? 를 사용할 수 있다.
찾은 결과를 받아 명령의 입력으로 실행할 수 있다. 다음은 현재 디렉토리 밑에서 .c 파일을 찾아 md5sum 으로 해시 값을 출력한다. -iname은 대소문자 구분을 하지 않는다.
1 | find -iname "*.c" -exec md5sum {} \; |
검색시 탐색 깊이는 -maxdepth 혹은 -mindepth를 사용할 수 있다.
1 | find -maxdepth 2 -iname "*.c" -exec md5sum {} \; |
어떤 파일을 제외한 것만 찾을 수 있다:
1 | find -maxdepth 1 -not -iname "mycprogram.c" |
파일의 퍼미션으로 찾을 수 있다.
1 | find . -perm -g=r -type f -exec ls -l {} \; |
찾은 후 삭제하기:
1 | find ./ -name 'Debug' -exec rm -rf {} \; |
find 명령으로 i-node를 통해서 지우기:
아래 처럼 특수문자로 “~” or “a b c” 등의 이상한 파일이 있을 경우 inode를 확인해 삭제에 유용하다.
1 | $ ls -i |
???? 같이 지워지지 안는 파일 같은 경우도 i-node로 삭제할 수 있다.
1 | ~$ ls -ali |
옵션 -type 은 파일 형식으로 찾을 수 있다. 파일 형식은:
b block special
c character special
d directory
f regular file
l symbolic link
p FIFO
s socket
일반 파일
1 | find . -type f |
소켓 형식의 파일
1 | find . -type s |
디렉토리 형식
1 | find . -type d |
숨겨진 파일만 검색도 가능하다.
1 | find . -type f -name ".*" |
역시 숨겨진 디렉토리만 찾을 수 도 있다.
1 | find -type d -name ".*" |
옵션 -size 를 사용해서 파일의 크기로 찾을 수 있다.
아래는 어떤 크기 보다 크거나, 작은 파일을 찾아 준다.
1 | find -size +100M # 보다 큰 파일 |
다음 같이 응용해 볼 수 있다. 100MB 보다 큰 파일을 찾아 삭제한다:
1 | find / -type f -name *.zip -size +100M -exec rm -i {} \; |
모든 파일의 수정된 시간 정보를 알 수 있다. test_1.txt의 시간을 기준으로 검색해 보자.
1 | ls -lrt test_1.txt |
옵션 -newer 에 대상 파일을 주면 해당 파일을 생성한 날짜 이후의 결과만을 표시하게 된다.
1 | find -newer test_1.txt |
유용한 find 명령들 alias로 만들어 사용하기도 한다.
a.out 인 파일 지우기
1 | alias rmao="find . -iname a.out -exec rm {} \;" |
c프로그램의 core 파일
1 | alias rmc="find . -iname core -exec rm {} \;" |
큰 파일 삭제…
1 | alias rm100m="find / -type f -name *.tar -size +100M -exec rm -i {} \;" |
iconv로 파일 인코딩을 변환할 수 있는데, 많은 파일을 한번에 처리하기 위해서 find와 결합해 찾은 모든 파일의 파일 인코딩을 변환할 수 있다.
다음은 .c 파일을 찾아 인코딩을 euc-kr에서 utf-8로 변환하는 명령이다.
1 | find ./ -name '*.c' -exec iconv -feuc-kr -tutf-8 {} -o {} \; |
find 를 사용하지 않는다면, 디렉토리 안에 있는 모든 파일의 인코딩을 변환하고자 할 때는 shell 조건문과 섞어서 사용할 수 있다.
1 | $ for F in './*.sql'; do iconv -c -feuc-kr -tutf-8 $F -o $F; done |
이 글은 우분투, 리눅스 박스에서 여러버전의 도구를 관리할 수 있는 update-alternatives 를 다루고 있다.
update-alternative 유틸리티로 리눅스 기본 제공 개발 환경의 gcc, cross compiler용 gcc 등 여러 버전의 gcc를 사용할 수 있게 구성할 수 있다.
이들 버전의 환경을 교체해서 사용하기를 원한다. update-alternative 도구를 사용할 수 있다.
여러 버전의 gcc를 update-alternative를 사용해서 선택적으로 사용할 수 있다. gcc 로 등록된 현재 버전 목록을 질의 한다.
1 | $ update-alternatives --query gcc |
여기서 사용하는 여러 gcc 버전들을 설치한 후에 다음과 같은 명령어로 등록을 할 수 있다.
1 | update-alternatives --install <link> <name> <path> <priority> |
Ubuntu 14.04 최신 버전에 gcc4.7, 4.8 를 사용하려고 설치했다고 가정한다.
1 | sudo apt-get update |
그리고 gcc 그룹에 4.8를 우선도가 높게 50으로 준다.
1 | sudo update-alternatives --install /usr/bin/gcc gcc /usr/bin/gcc-4.8 50 --slave /usr/bin/g++ g++ /usr/bin/g++-4.8 |
여기서 gcc를 master로 g++을 slave로 준비했다. --slave 옵션은 --install 로 지정한 master에 종속해서 여러개의 슬레이브를 마스터에 추가할 수 있고, 마스터의 링크가 바뀌면 슬레이브도 함께 바뀐다.
두번째 버전은 gcc-4.7 버전을 우선도가 40 정도로 하자.
1 | sudo update-alternatives --install /usr/bin/gcc gcc /usr/bin/gcc-4.7 50 --slave /usr/bin/g++ g++ /usr/bin/g++-4.7 |