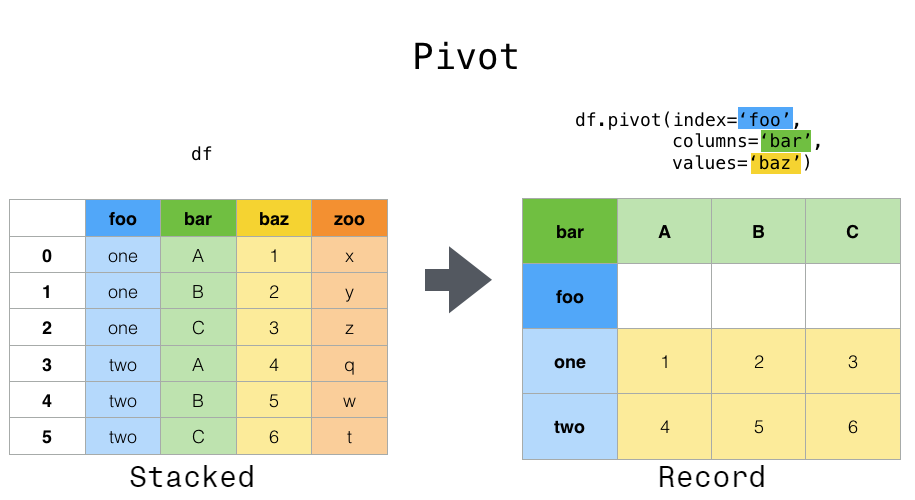
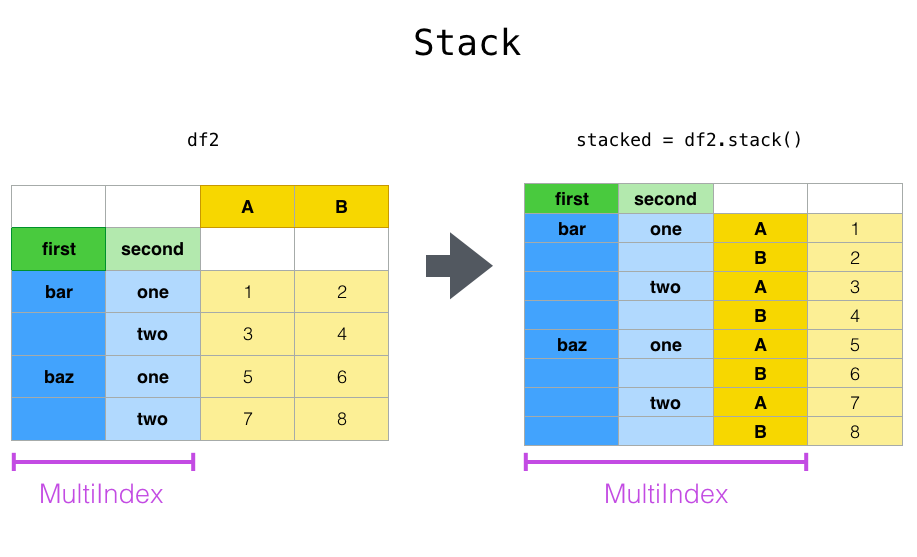
위 데이터는 stack()을 하면 A, B 컬럼이 MultiIndex 로 추가되며 A, B 컬럼 데이터 포인트가 배치된다.
1
df.stack()
first second
bar one A -1.301694
B -0.013259
two A -0.197846
B 0.879890
baz one A 0.718211
B -0.739434
two A -0.140217
B 0.071260
foo one A -1.142268
B -2.606413
two A 1.119145
B 0.109402
qux one A -0.504167
B -1.703280
two A 1.064976
B 1.011060
dtype: float64
1
2
df2 = df[:4] df2
A
B
first
second
bar
one
-1.301694
-0.013259
two
-0.197846
0.879890
baz
one
0.718211
-0.739434
two
-0.140217
0.071260
1 2
stacked = df2.stack() stacked
first second
bar one A -1.301694
B -0.013259
two A -0.197846
B 0.879890
baz one A 0.718211
B -0.739434
two A -0.140217
B 0.071260
dtype: float64
> with np.printoptions(precision=3): > print( np.array([2.0]) / 3 )
pandas 숫자 출력 형식 변경
pandas에서 몇 가지 옵션을 바꾸는 방법을 정리해 보자. pandas의 옵션은 pd.options 를 사용한다.
pd.options.display
출력의 형태, 표기를 변경하는 것은 pd.options.display 아래에 있다. 여기서 사용할 수 있는 옵션은 describe_option() 으로 확인할 수 있다.
1
2
3
4
5
6
7
> pd.describe_option() compute.use_bottleneck : bool Use the bottleneck library to accelerate if it is installed, the default isTrue Valid values: False,True [default: True] [currently: True] ...
- row, column 출력 개수 조정
pd.options.display.max_rows : 표를 출력할 때 최대 행 수입니다.
pd.options.display.min_rows : 표를 출력할 때 최소 행 수입니다.
1 2 3 4 5
import pandas as pd > pd.options.display.max_rows 60 > pd.options.display.min_rows 10
pd.describe_option(OPTIONS) 를 사용하면 해당 옵션에 대한 설명을 출력해 준다.
1 2 3 4 5
> pd.describe_option("max_rows") display.max_rows : int If max_rows is exceeded, switch to truncate view. Depending on `large_repr`, objects are either centrally truncated or printed as a summary view. 'None' value means unlimited.
[project] name = "example_package_YOUR_USERNAME_HERE" version = "0.0.1" authors = [ { name="Example Author", email="author@example.com" }, ] description = "A small example package" readme = "README.md" requires-python = ">=3.7" classifiers = [ "Programming Language :: Python :: 3", "License :: OSI Approved :: MIT License", "Operating System :: OS Independent", ]
This is a simple example package. You can use [Github-flavored Markdown](https://guides.github.com/features/mastering-markdown/) to write your content.
LICENSE 파일에 저작권을 명시한다.
1 2 3
Copyright (c) 2018 The Python Packaging Authority
Permission is hereby granted, free of charge, to any person obtaining a copy
배포 묶음 생성하기
배포를 위한 build 도구를 설치한다.
1
python3 -m pip install --upgrade build
packaging_tutorial 폴더 아래 pyproject.toml 파일이 있는 위치에서 배포를 위한 build 명령으로 소스를 패키징을 한다.
build 를 수행하면 별도의 venv 가상환경을 생성해서 의존성에 명시된 setuptools 등을 설치하고 빌드를 진행한다.
1
2
3
4
5
6
7
> python3 -m build * Creating venv isolated environment... * Installing packages in isolated environment... (setuptools>=61.0) ... ... removing build\bdist.win-amd64\wheel Successfully built example_package_YOUR_USERNAME_HERE-0.0.1.tar.gz and example_package_YOUR_USERNAME_HERE-0.0.1-py3-none-any.whl
이 명령의 결과로 dist 폴더에 우리 프로젝트에 대한 배포용 패키징으로 소스 패키징 .gz 파일, built distribution 패키징 .whl 2개의 파일이 생성된다.
jupyterlab 의 확장 모듈을 다운받아 설치시 nodejs 실행 환경이 제공되야 한다.
jupyterlab 확장 build error
jupyterlab 의 확장 모듈을 다운받아 설치하다 보면 npm 과 연계한 프로그램이 많다. 아래 같은 nodejs 관련 에러를 발생한다.
1 2 3 4 5 6
daddy> jupyter lab build ... ... An error occurred. RuntimeError: npm dependencies failed to install See the log file for details: C:\Users\USERID\AppData\Local\Temp\jupyterlab-debug-4kr1lkn1.log
결론으로 현재 jupyterlab 을 실행하는 환경에서
nodejs 버전이 설치되어 있고
jupyterlab extensions가 활성화 되어 있다면
해당 로그 파일을 확인해 보면 대부분 nodejs 버전이 일치하지 않아서 아래 같은 로그를 기록하고 있어 보인다.
1
2
error readable-stream@4.3.0: The engine "node" is incompatible with this module. Expected version "^12.22.0 || ^14.17.0 || >=16.0.0". Got "14.15.0" error Found incompatible module.
회사 등에서 방화벽을 사용하는 경우 pip / conda 저장소에서 패키지 설치가 안되는 경우가 있다. 또한 방화벽 안에서 설치할 경우 SSL verification error 에러 발생으로 설치가 안되기도 한다. 이런 경우 직접 pip 혹은 conda 설치가 안되는 경우에 프락시 지정을 해서 사용이 가능하다.
(jupyter_p310) PS C:\Users\andro> jupyter-lab --no-browser .\jupyter-work\ ... [I 2022-05-2403:27:03.847 ServerApp] Serving notebooks from local directory: C:\Users\andro\jupyter-work [I 2022-05-2403:27:03.847 ServerApp] Jupyter Server 1.17.0 is running at: ... To access the server, open this file in a browser: file:///C:/Users/andro/AppData/Roaming/jupyter/runtime/jpserver-4664-open.html OrcopyandpasteoneoftheseURLs: http://localhost:8888/lab?token=866bdd9bed841f4dafc5c431a7ffcd4b01f516e4583f38d7 orhttp://127.0.0.1:8888/lab?token=866bdd9bed841f4dafc5c431a7ffcd4b01f516e4583f38d7 [W 2022-05-24 03:28:04.189 LabApp] Couldnotdeterminejupyterlabbuildstatuswithoutnodejs
원격 접속등을 위해서 비밀번호를 사용한다. 그러기 위해서 구성 파일을 통해서 비밀번호, 포트 번호등을 설정해야 한다.
generate-config
Jupyter Lab 에서 설정 파일을 생성한다. 다음 명령으로 각각 $HOME/.jupyter/ 위치에 jupyter_notebook_config.py 파일이 생성된다.
1
(daeshin_hts)> jupyter lab --generate-config
jupyter_notebook_config.py 설정 파일에 비밀번호를 추가하려면 비밀번호를 생성하는데 jupyter 명령과 python 명령에서 생성하는 2가지 방법이 있다.
1) jupyter 명령으로 패스워드 생성
첫번째로 아래는 쥬피터 폴더에 있는 파일 ‘jupyter_notebook_config.json’에 패스워드를 생성해 준다.
1 2 3
(daeshin_hts)$ jupyter notebook password Enter password: Verify password: [NotebookPasswordApp] Wrote hashed password to $HOME\.jupyter\jupyter_notebook_config.json
위 명령으로 jupyter_notebook_config.json에 암호가 생성되면 “”sha1:723c…” 로 시작하는 패스워드 해시코드를 복사한 후 jupyter_notebook_config.py 파일의 c.NotebookApp.password 항목에 입력을 한다.
2) python 명령으로 비밀번호 생성
비밀번호 설정 다른 방법으로 파이썬에서 passwd 모듈을 실행해서 비밀번호를 얻을 수 있습니다.
1 2 3 4 5 6 7
(daeshin_hts)$ python >> from notebook.auth import passwd >> passwd() >> Enter password: >> Verify password:
'sha1:********'
출력되는 sha1 암호문자열을 복사해서 사용하시면 됩니다.
1 2 3 4 5
[jupyter_notebook_config.py]
c.NotebookApp.password = 'sha1:*********'# 외부 접속시 사용할 비밀번호 c.NotebookApp.ip = '*'# 어디서든 접속 가능 c.NotebookApp.port = 8888 # 접속에 사용할 포트
Powershell Openssh 설치
윈도우에 원격 접속해서 HTS를 위한 파이썬 가상환경에서 jupyterlab을 실행할 필요가 있다. 이때 윈도우 파워쉘에서 openssh 설치하고 연결한 후에 administrator 계정으로 관리자 모드로 jupyhter 를 실행한다.
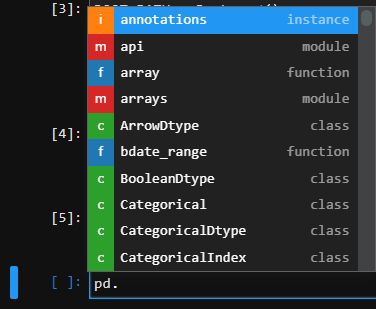 그림>
그림>
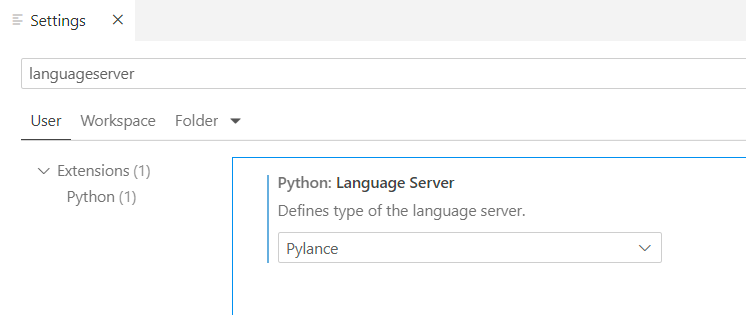
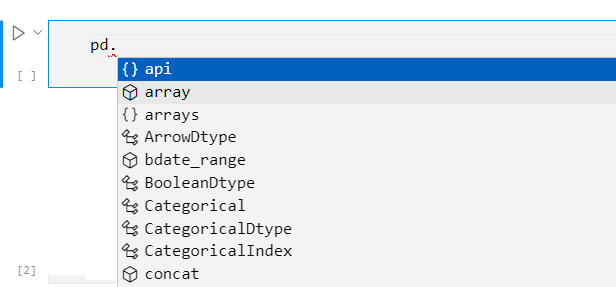

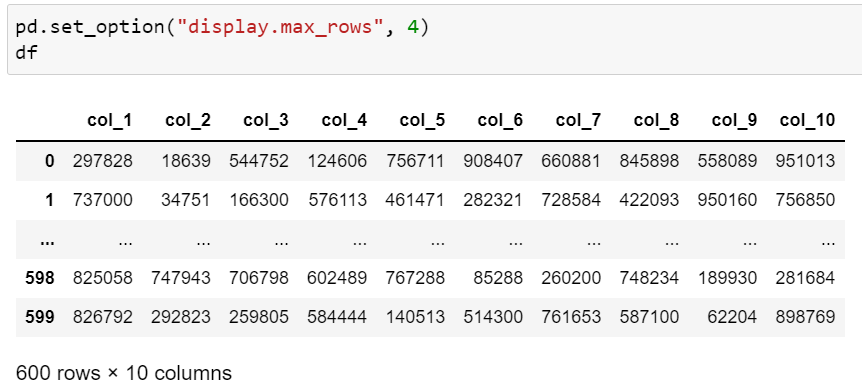 이미지 참조