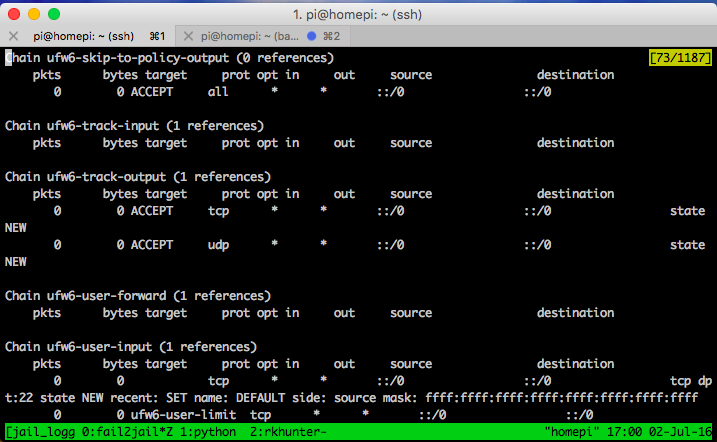
Monitoring fail2ban

Monitoring fail2ban

Install

로그를 검사해 의심스런 IP 를 찾아 Firewall rule을 관리하기 어렵다 Fail2ban은 정규표현식을 사용해서 로그에서 의심스런 IP를 찾아 Firewall 등록할 수 있도록 해준다.

Fail2ban

로그를 검사해 의심스런 IP 를 찾아 Firewall rule에 등록해 관리하는 것은 어려운 과정이다. Fail2ban은 정규표현식을 사용해서 로그에서 의심스런 IP를 찾아 Firewall 등록 할 수 있도록 해준다.

설치

fail2baniptables 패키지와 함께 설치한다.

1
$ sudo apt install iptables fail2ban

그리고 systemctl 로 재대로 서비스가 시작되는지 확인해 본다.

1
2
$ sudo systemctl restart fail2ban.service    # 재시작
$ sudo systemctl status fail2ban.service # running 상태 확인

설정을 위해서 fail2ban 설정 파일인 fail2ban.conf, 그리고 jail 파일 jail.conf 파일을 .local 파일로 복사한 사용자 정의 파일에서 사용한다.

1
2
3
$ cd /etc/fail2ban
$ sudo cp fail2ban.conf fail2ban.local # 설정파일
$ sudo cp jail.conf jail.local # jail 설정

/etc/fail2ban 디렉토리

설치된 후 관련된 설정 파일은 /etc/fail2ban 디렉토리에 저장됩니다. 관련한 로그 기록은 /etc/logratate.d/fail2ban에 정의되어 /var/log/fail2ban.log 로 저장됩니다.

다음은 설정 디렉토리 구조

1
2
3
4
5
6
7
8
9
10
11
12
13
14
15
16
17
18
19
$ tree -L 2 fail2ban/
fail2ban/
├── action.d
│   ├── ...
│   ├── ufw.conf
│   └── xarf-login-attack.conf
├── fail2ban.conf
├── fail2ban.local
├── fail2ban.d
├── filter.d
│   ├── ...
│   ├── sshd.conf
│   └── xinetd-fail.conf
├── jail.conf
├── jail.d
│   └── defaults-debian.conf
├── jail.local
├── paths-common.conf
└── paths-debian.conf
  • jail.conf: jail 이라 불리는 모니터링할 대상에 대한 기본 옵션과 행위를 선언한다.
  • action.d/iptables-multiport.conf: fila2ban 이 jail에 맞게 거부(Ban)한 IP를 다루는 기본 액션이다.
  • fail2ban.local : fail2ban 주요 설정 파일
  • jail.local: jail 설정 파일
  • jaild.d/defaults-debian.conf: jail enable/disable
  • paths-common.conf: 로그 파일 경로
  • paths-debian.conf: 로그 파일 경로

설정

fail2ban은 jail 을 구성하고 jail의 filter 그리고 action으로 나뉘어 있다.

fail2ban.conf 구성

fail2ban.conf는 기본 구성 변수로 loggin, socket 그리고 PID 파일 등등이 설정된다. 별도의 파일로 Jail을 구성할 때 fail2ban.local 같은 이름을 사용하고 새로 설정되는 값은 기본 설정 값을 재정의 하게 된다.

단 같은 [default] 섹션이 존재하면 구성된 내용 적용이 잘 안된다.

다음 스크립을 사용하면 모둔 변수를 주석 처리하고 수정할 옵션만 복사해 준다.

1
sed 's/\(^[[:alpha:]]\)/# \1/' fail2ban.conf | sudo tee fail2ban.local 1&> /dev/null

fail2ban.local 파일은 다음과 같은 내용을 담을 것이다.

  • loglevel: The level of detail that Fail2ban’s logs provide can be set to 1 (error), 2 (warn), 3 (info), or 4 (debug).
  • logtarget: Logs actions into a specific file. The default value of /var/log/fail2ban.log puts all logging into the defined file. Alternately, you can change the value to STDOUT, which will output any data; STDERR, which will output any errors; SYSLOG, which is message-based logging; and FILE, which outputs to a file.
  • socket: The location of the socket file.
  • pidfile: The location of the PID file.

jail.conf

/etc/fail2ban/jail.conf 는 데몬, 서비스에 대한 jail을 구성한다. jail은 log를 읽어 불필요한 것을 찾아 낸다.
다음은 jail.conf에서 주석이 달린 jail.local을 생성해 준다.

1
sed 's/\(^[[:alpha:]]\)/# \1/' jail.conf | sudo tee jail.local 1&> /dev/null

If using CentOS or Fedora open jail.local and set the backend to systemd. This is not necessary on Debian 8, even though it is a SystemD system.

/etc/fail2ban/jail.local

1
backend = systemd

화이트리스트 IP

먼저 검출된 IP 중에 무시할 영역, 화이트리스트를 선언해 줍니다. 리스트는 ‘,’로 구분하고 서브넷 혹은 IP주소를 입력한다.

1
2
[DEFAULT]
ignoreip = 127.0.0.1/8 192.168.0.1/24

차단 시간과 재시도 횟수

bantime, findtime, maxretry 은 차단 시간에 대한 구성이다.

1
2
3
bantime = 2592000
findtime = 600
maxretry = 3
  • bantime: 검출된 IP가 접속 차단 시간을 초단위로 선언해 준다. -1 이면 영속적으로 밴 된다.
  • findtime: ban이 설정 전에 로그인 간격 시간
  • maxretry: 최대 횟수

https://arno0x0x.wordpress.com/2015/12/30/fail2ban-permanent-persistent-bans/

로컬 시스템의 이메일 주소를 sendmail -t user@email.com, replacing user@email.com with your email address.

이메일

fail2ban에 검출되는 jail이 있으면 이메일 설정에 따라 메일로 경고를 받을 수 있다.

  • destemail: The email address where you would like to receive the emails.
  • sendername: The name under which the email shows up.
  • sender: The email address from which Fail2ban will send emails.

그리고 action 설정을 조절할 필요가 있다, 이것은 ban 상황이 기준점에 닿으면 발생한다. 기본 액션 %(action_)s은 사용자만 ban 한다. action_mw 액션은 ban을 실행하고 WhoIS 리포트로 메일을 보내준다. action_mwl은 모든 로그까지 함께 보내준다.

You will also need to adjudst the action setting, which defines what actions occur when the threshold for ban is met. The default, %(action_)s, only bans the user. action_mw will ban and send an email with a WhoIs report; while action_mwl will ban and send an email with the WhoIs report and all relevant lines in the log file. This can also be changed on a jail-specific basis.

1
action = %(action_)s
1
$ sudo service fail2ban restart

각 서버스에 대한 Jail 설정

필터를 이용해 Jail을 만들어 의심스런 접근을 막아 보자. 앞서 복사한 jail.local 파일에는 주요 서비스가 모두 선언되어 있고 sshd 만 활성화 되어 있다.

Jail은 다음 같이 구성된다.

1
2
3
4
5
6
7
8
[ssh]

enabled = true
port = ssh
filter = sshd
logpath = /var/log/auth.log
maxretry = 6

  • enabled: Determines whether or not the filter is turned on.
  • port: The port Fail2ban should be referencing in regards to the service. If using the default port, then the service name can be placed here. If using a non-traditional port, this should be the port number. For example, if you moved your SSH port to 3456, you would replace ssh with 3456.
  • filter: The name of the file located in /etc/fail2ban/filter.d that contains the failregex information used to parse log files appropriately. The .conf suffix need not be included.
  • logpath: Gives the location of the service’s logs.
  • maxretry: Will override the global maxretry for the defined service. findtime and bantime can also be added.
    action: This can be added as an additional setting, if the default action is not suitable for the jail. Additional actions can be found in the action.d folder.

각 서비스에 대한 jail은 jail.d에 설정 파일을 구성해도 된다.

(1) sshd

Brute-force Attack과 같은 접근을 차단하는 필터로 로그에 아래와 유사한 패턴이 나오면 IP를 검출한다.

Jul 22 06:56:50 foo sshd[14984]: Failed password for invalid user a from xxx.xxx.xxx.xxx port 55452 ssh2

jail.config 혹은 jail.local 에서 기본으로 활성화 되어 있다.

(2) ssh-ddos

sshd-ddos Filter를 사용해 SSH Service를 Scanning하거나 telnet으로 접속할 떄 발생하는 Message를 검사하여 해당 IP의 접근을 차단할 수 있습니다.

이 Filter로 검출되는 /var/log/auth.log의 Message는 다음과 같습니다.

Jul 23 13:16:25 foo sshd[21989]: Did not receive identification string from xxx.xxx.xxx.xxx

Jail 설정을 위해서 다음과 같이 입력합니다.

1
2
[sshd-ddos]
enabled = true

혹은 $ sudo vi /etc/fail2ban/jail.d/sshd-ddos.conf

1
$ sudo service fail2ban restart

Failregrexs

다양한 필터를 사용할 수있다. 의심스런 동작을 Filter로 선언해서 사용하는데 해당 필터를 점검해야할 필요가 있다. 다음

1
$ sudo fail2ban-regex /var/log/auth.log /etc/fail2ban/filter.d/sshd.conf

이 필터를 사용자가 작성할 수 있는데 파이썬의 정규식을 사용해서 사용자 지정 필터를 작성한다.

access.log 필터 작성해 보기

nginx 로그를 대상으로 200 에러를 검출해 보자

1
91.134.232.57 - - [28/Nov/2016:07:30:23 +0900] "GET / HTTP/1.1" 200 1125 "http://hundej

123.143.201.75 - - [28/Nov/2016:17:29:18 +0900] “HEAD / HTTP/1.1” 200 0 “-“ “python-requests/2.10.0”

fail2ban-regex /var/log/nginx/access.log /etc/fail2ban/filter.d/nginx-test.conf

Ban 관리

fail2ban-client set YOURJAILNAMEHERE unbanip IPADDRESSHERE

Use iptables -L -n to find the rule name…
…then use fail2ban-client status to get the actual jail names.

룰 이름이 표시된다 f2b- 으로 시작하는 룰을 찾는다

그리고 fail2ban-status 는

fail2ban-client set YOURJAILNAMEHERE unbanip IPADDRESSHERE

HOW to fail2ban

basic usages

1
2
sudo fail2ban-regex /var/log/auth.log /etc/fail2ban/filter.d/sshd.conf

1
sudo iptables -L --line-numbers

Nginx

기본으로 /etc/fail2ban/jail.conf 에 [nginx-http-auth] jail이 하나 선언되어 있다.

[nginx-http-auth]

enabled = true
filter = nginx-http-auth
port = http,https
logpath = /var/log/nginx/error.log

nginx jail

nginx-noscript

웹 사이트에서 실행되고 침투할 수 있는 코드를 찾아 준다. php 등이 웹 사이트와 연동되지 않았다면 아래 제일을 추가해서 이런 임의의 실행코드 형식 실행을 방지할 수 있다

1
2
3
4
5
6
7
8
[nginx-noscript]

enabled = true
port = http,https
filter = nginx-noscript
logpath = /var/log/nginx/access.log
maxretry = 6

nginx-badbots

웹 요청에 악의적인 봇을 호출하는 것을 방지한다.

1
2
3
4
5
6
7
[nginx-badbots]

enabled = true
port = http,https
filter = nginx-badbots
logpath = /var/log/nginx/access.log
maxretry = 2

filter

추가한 jail 이 동작할 필터를 작업해 주어야 한다. 필터는 /etc/fail2ban/filter.d 디렉토리에 있다.

nginx-http-auth.conf

기본으로 제공하는 nginx-http-auth.conf 필터에 하나를 더 추가해 준다. 아래는 사용자가 아이디와 비밀번호를 입력하지 않는 경우에 대해 필터한다. 아래의 no user/password 패턴을 추가한다.

1
2
3
4
5
6
7
[Definition]


failregex = ^ \[error\] \d+#\d+: \*\d+ user "\S+":? (password mismatch|was not found in ".*"), client: <HOST>, server: \S+, request: "\S+ \S+ HTTP/\d+\.\d+", host: "\S+"\s*$
^ \[error\] \d+#\d+: \*\d+ no user/password was provided for basic authentication, client: <HOST>, server: \S+, request: "\S+ \S+ HTTP/\d+\.\d+", host: "\S+"\s*$

ignoreregex =

nginx-badbots.conf

1
sudo cp apache-badbots.conf nginx-badbots.conf

nginx-noscript

[nginx-noscript] jail 은 다음 내용을 입력한다:

1
2
3
4
5
[Definition]

failregex = ^<HOST> -.*GET.*(\.php|\.asp|\.exe|\.pl|\.cgi|\.scgi)

ignoreregex =

nginx-nohome

1
2
3
4
5
[Definition]

failregex = ^<HOST> -.*GET .*/~.*

ignoreregex =

nginx-noproxy

1
2
3
4
5
[Definition]

failregex = ^<HOST> -.*GET http.*

ignoreregex =

Jail 실행 확인

1
2
3
4
$ sudo fail2ban-client status
Status
|- Number of jail: 6
`- Jail list: nginx-noproxy, nginx-noscript, nginx-nohome, nginx-badbots, ssh-ddos, ssh

그리고 iptable의 서비스로 방화벽 규칙에 fail2ban 규칙이 동작중인지 확인한다.

1
2
3
4
5
6
7
8
9
10
11
12
 $ sudo iptables -S
...

-A fail2ban-nginx-badbots -j RETURN
-A fail2ban-nginx-nohome -j RETURN
-A fail2ban-nginx-noproxy -j RETURN
-A fail2ban-nginx-noscript -j RETURN
-A fail2ban-ssh -j RETURN
-A fail2ban-ssh-ddos -j RETURN

...

그리고 fail2ban 의 jail 실행 상태를 자세히 보고 싶므면 status 뒤에 jail 이름을 주면 된다.

1
2
3
4
5
6
7
8
9
10
$ sudo fail2ban-client status nginx-badbots
Status for the jail: nginx-badbots
|- filter
| |- File list: /var/log/nginx/access.log
| |- Currently failed: 0
| `- Total failed: 0
`- action
|- Currently banned: 0
| `- IP list:
`- Total banned: 0

Testing

의심스런 동작을 Filter로 선언해서 사용하는데 해당 필터를 점검해야할 필요가 있다. 다음

1
$ sudo fail2ban-regex /var/log/auth.log /etc/fail2ban/filter.d/sshd.conf

Ban 관리

nginx 인증 요구시 잘못된 인증을 시도하면 fail2ban 규칙에 따라 접근이 금지당한다. 그리고 jail 규칙이 잘 적용 됐는지 결과를 다음 같이 확인할 수 있다:

1
2
3
4
5
6
7
8
9
10
11
$ sudo fail2ban-client status nginx-http-auth
Output
Status for the jail: nginx-http-auth
|- filter
| |- File list: /var/log/nginx/error.log
| |- Currently failed: 0
| \- Total failed: 12
\- action
|- Currently banned: 1
| \- IP list: 111.111.111.111
\- Total banned: 1

인증 규칙에 어긋나는 접근을 시도한 IP인 111.111.111.111을 확인 할 수 잇다.
금지된 IP는 해당 jail을 이용해 다음 같이 해제할 수 있다.

1
$ sudo fail2ban-client set nginx-http-auth unbanip 111.111.111.111

nginx-req-limit

http://blog.ricardomacas.com/index.php?controller=post&action=view&id_post=3

fail2squared

https://supine.com/posts/2012/08/fail2ban-monitoring-itself-recursively/

TO COMPLETELY FLUSH THE FAIL2BAN LOG FILE AND CLEAR OUR BLACKLIST FILE

sudo service fail2ban stop
sudo truncate -s 0 /var/log/fail2ban.log
sudo truncate -s 0 /etc/fail2ban/ip.blacklist
sudo rm /var/lib/fail2ban/fail2ban.sqlite3
sudo service fail2ban restart

https://ubuntu101.co.za/security/fail2ban/fail2ban-persistent-bans-ubuntu/

sqlite3

fail2ban.conf file, I found the following:

1
dbfile = /var/lib/fail2ban/fail2ban.sqlite3

So, I did a little research to try to find out how access the database.

To open or connect to the database:

1
$ sqlite3 /var/lib/fail2ban/fail2ban.sqlite3

To list all the tables in the database:

1
2
sqlite> .tables
bans fail2banDb jails logs

To query a table:

1
sqlite> SELECT * FROM logs;

Another table:

sqlite> SELECT * FROM bans;

To disconnect from the database:

sqlite> .quit

참조

참조: https://www.digitalocean.com/community/tutorials/how-to-protect-ssh-with-fail2ban-on-debian-7

fail2ban log

fail2ban log

fail2ban 로그는 아래 형태로

1
2
3
4
5
6
7
8
9
2016-08-28 12:35:56,163 fail2ban.actions[860]: WARNING [ssh] Ban 103.237.147.19
2016-08-28 12:36:09,215 fail2ban.actions[860]: WARNING [ssh] Ban 115.248.186.3
2016-08-28 17:39:47,806 fail2ban.actions[860]: WARNING [ssh] Ban 117.3.120.94
2016-08-28 23:06:21,291 fail2ban.actions[860]: WARNING [ssh] Ban 155.94.163.64
2016-08-29 19:50:51,400 fail2ban.actions[860]: WARNING [ssh] Ban 182.75.249.110
2016-08-31 14:26:54,093 fail2ban.actions[860]: WARNING [ssh] Ban 103.207.36.36
2016-09-01 02:23:23,790 fail2ban.actions[860]: WARNING [ssh] Ban 45.32.60.93
2016-09-01 17:44:35,854 fail2ban.filter [860]: WARNING Determined IP using DNS Lookup: 61-216-182-218.hinet-ip.hinet.net = ['61.216.182.218']
2016-09-01 17:47:18,004 fail2ban.actions[860]: WARNING [ssh] Ban 61.216.182.218

awk 이용 ip 주소 추출

awk 를 사용해서 로그에서 ip주소를 추출해 보자. 로그 내용에서 ‘Ban’을 포함한 줄을 만나면 $NF 변수에 각 컨럼을 저장한다.

1
2
3
4
5
$sudo awk '($(NF-1) = /Ban/){print $NF}' /var/log/fail2ban.log
103.237.147.19
115.248.186.3
117.3.120.94

IP주소를 정렬

1
2
3
4
$sudo awk '($(NF-1) = /Ban/){print $NF}' /var/log/fail2ban.log | sort | uniq -c | sort -n
1 103.207.36.36
1 103.237.147.19
1 115.248.186.3
  • 각 거부당한 IP 주소는 최대 실패 횟수 이후 ban 하므로 30회 이상의 시도가 있을

모든 백업 로그에서 IP 주소 추출

백업된 로그 파일을 모두 사용하려면 zgrep 명령을 사용해도 좋다

1
$sudo zgrep -h "Ban " /var/log/fail2ban.log* | awk '{print $NF}' | sort | uniq -c | sort -n

다음은 아주 위험한 서브넷을 출력한다.

1
2
3
4
5
6
7
8
9
10
11
$sudo zgrep -h "Ban " /var/log/fail2ban.log* | awk '{print $NF}' | awk -F\. '{print $1"."$2"."}' | sort | uniq -c  | sort -n | tail
2 222.186.
3 111.74.
3 116.100.
3 182.100.
3 195.154.
3 42.117.
7 115.239.
8 91.224.
14 103.207.
39 221.229.
1
2
3
4
5
6
$sudo zgrep -c 221.229 /var/log/fail2ban.log*
/var/log/fail2ban.log:0
/var/log/fail2ban.log.1:2
/var/log/fail2ban.log.2.gz:0
/var/log/fail2ban.log.3.gz:2
/var/log/fail2ban.log.4.gz:68

전체 로그에 순위 매기기

1
2
3
4
5
zcat /var/log/auth.log* | grep 'Failed password' | grep sshd | awk '{print $1,$2}' | sort -k 1,1M -k 2n | uniq -c

161 Mar 20
202 Mar 21

참조
Multiple log file

http://serverfault.com/questions/486301/how-to-set-up-fail2ban-to-read-multi-log-in-a-jail

Ubuntu/시스템 전원관리

Ubuntu - 시스템 전원관리

우분투 시스템을 명령으로 잠자기, 깨우기가 가능하다. 컴퓨터의 BIOS에서 Wake On Lan이 활성화 되어야한다.

WakeOnLan

wakeonlan을 활성화 하려면 이더넷 인터페이스를 화인한다.

1
2
3
4
5
6
7
8
9
$ ifconfig
enp5s0 Link encap:Ethernet HWaddr 0f:1a:92:51:70:a9
inet addr:192.168.0.10 Bcast:192.168.0.255 Mask:255.255.255.0
inet6 addr: fe20::6595:e3fd:ad6:10f1/64 Scope:Link
UP BROADCAST RUNNING MULTICAST MTU:1500 Metric:1
RX packets:85121 errors:0 dropped:0 overruns:0 frame:0
TX packets:11677 errors:0 dropped:0 overruns:0 carrier:0
collisions:0 txqueuelen:1000
RX bytes:25916710 (25.9 MB) TX bytes:1481803 (1.4 MB)
자세히 보기

Tmux cheatsheet

  • 2017-07-14: 윈도우에서 session 관리
  • 2017-07-10: tmux copy & paste
    {:.right-history}

터미널 명령은 $ tmux 로 표현하고, Tmux window 에서 Prefix key 키 조합은 는 C{:.keyword} 표기하고, Meta key인 AltM{:.keyword}으로 표기한다 - Tmux Start 참조.

자세히 보기

Tmux Start

2026-05-29: 내용 문맥 조정
2017-07-10: tmux-continum 추가

Tmux는 terminal multiplexer로 서버에 여러 프로그램을 세션에 저장하고, 다른 작업 혹은 연결을 끊었다 다시 접속해서 세션을 열어 작업을 이어갈 수 있다.

[그림. Tmux 실행 모습 (tmux.github.io)]

설치

여기서는 tmux 2.x, 3.x 에도 적용할 수 있다.

  • Ubuntu 24.04, 26.04
  • Ubuntu 14.04, Raspbian Jessie, Armbian 등에서 tmux가 1.8, 1.9 버전이 제공
  • Ubuntu 15, 16 Xenivior 버전은 Tmux 2.1
  • macOS는 brew 를 사용한다.

Tmux 설치

  • Old 버전 Ubuntu 14.04, Raspbian 등에서 tmux가 1.8, 1.9 버전이 제공되는데 package manager 같은 기능을 사용할 수 없다. 소스로 빌드해서 사용할 수 있다.
  • Ubuntu 14.04 desktop, orangepi plus, raspberry pi jessie 초기 버전은 빌드 필요

소스 설치

혹시 모르니 기존 낮은 버전의 tmux를 삭제하고 시작해 보자.

1
$ sudo apt remove --purge tmux

소스를 https://github.com/tmux/tmux/releases/ 에서 최신 버전으로 다운로드 하고 빌드한다.

1
2
3
4
5
6
7
sudo apt update
sudo apt install -y libevent-dev libncurses-dev
wget https://github.com/tmux/tmux/releases/download/2.3/tmux-2.3.tar.gz
tar xvzf tmux-2.3.tar.gz
cd tmux-2.3/
./configure && make
sudo make install

deb 바이너리 설치

단, libtinfo5 6.x 설치시 의존성 라이브러리 문제로 패키지 삭제 문제 발생!!!

https://launchpad.net/ubuntu/yakkety/amd64/tmux/2.2-3 에 빌드되어 있는 바이너리를 Ubuntu 14.04 설치하기 위해서 다음 패키지 버전이 필요하다.

Depends on:

  • libc6 (>= 2.14)
  • libevent-2.0-5 (>= 2.0.10-stable)
  • libtinfo5 (>= 6)
  • libutempter0 (>= 1.1.5)

기본 설치후 업그레이드를 했다면 libc6 버전은 문제가 없는듯.

1
2
$ sudo apt-cache show libc6
$ sudo apt-cache show libtinfo5

Ubuntu14.04.4 LTS 버전의 libtinfo5는 5.9로 다음 같이 설치해 준다.

1
$ wget http://launchpadlibrarian.net/271601076/libtinfo5_6.0+20160625-1ubuntu1_amd64.deb

그리고 tmux 2.2 버전의 deb 를 다운로드한다.

1
$ wget http://launchpadlibrarian.net/263289132/tmux_2.2-3_amd64.deb

설치

1
2
$ sudo dpkb -i libtinfo5_6.0+20160625-1ubuntu1_amd64.deb
$ sudo dpkb -i tmux_2.2-3_amd64.deb

이제 tmux 명령으로 다중 터미널 명령을 사용할 수 있다.

macOS에서 tmux 설치

homebrew를 사용해서 tmux를 설치한다. 2017년 현재 2.4 버전이 설치된다.

1
$ brew install tmux

이제 tmux 명령으로 시작할 수 있다.

시작

tmux 를 시작하면 하나의 세션에 하나의 윈도우가 만들어 진다.

1
2
$ tmux                   # 세션을 시작하고 참가한다.
$ tmux new -s foo # 세션 foo를 시작하고 참가한다

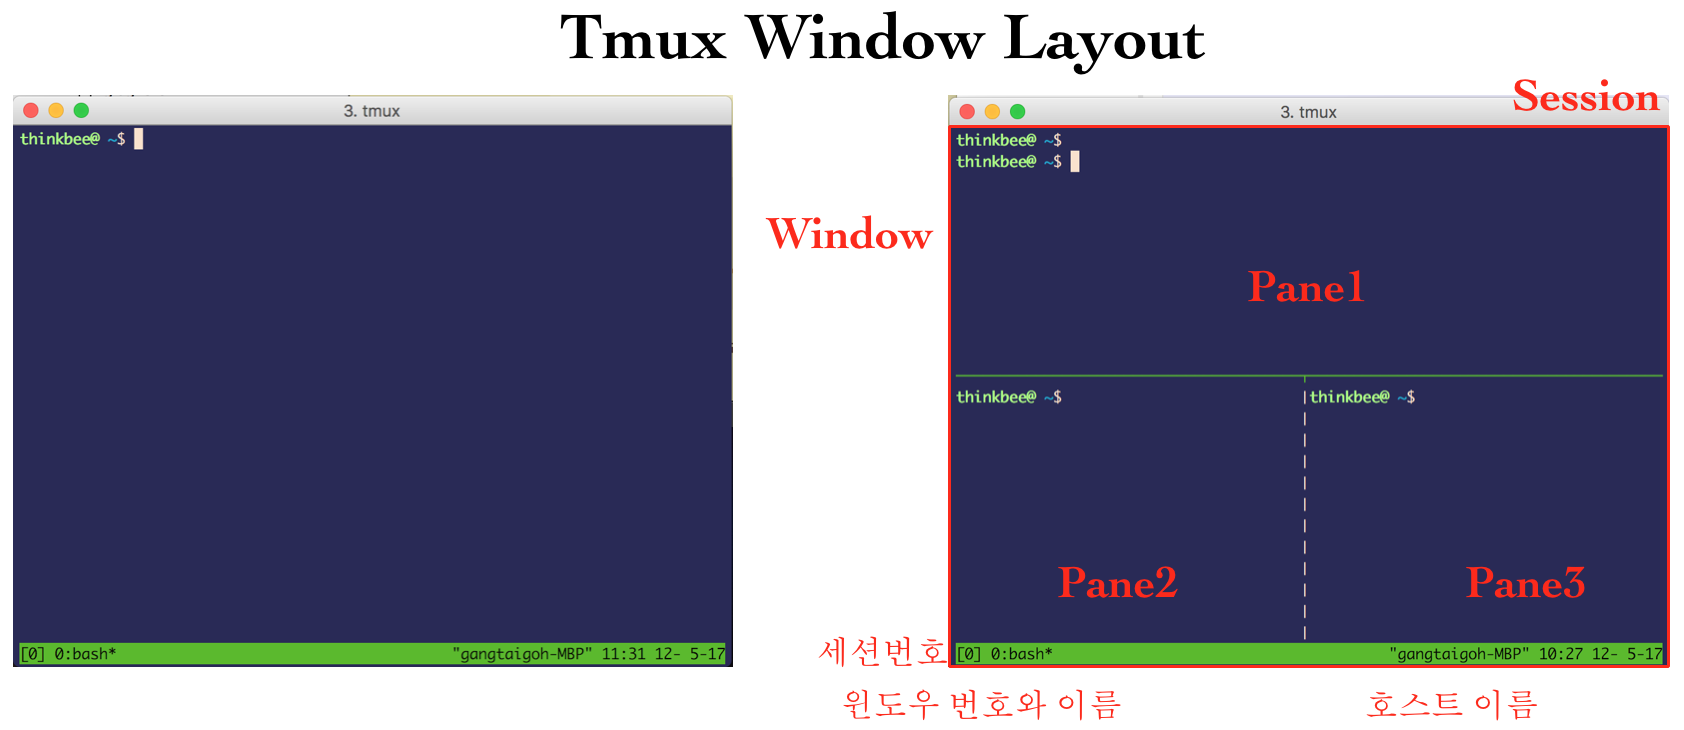
세션에 참가하면 하나 혹은 그 이상의 윈도우에서 Pane을 배치해 사용할 수 있다.


[그림. Tmux window layout]

Control와 Meta key

Tmux 세션 참가후 Window에서는 Prefix key로 Session, Window, Pane 관련 명령을 키로 조합해 사용한다. 기본 Prefix key는 Control+b key고 옵션으로 사용하는 Meta key는 Alt 키 이다.

여기서 Prefix key는 C와 조합으로 표기하고, Meta key인 AltM으로 표기한다.

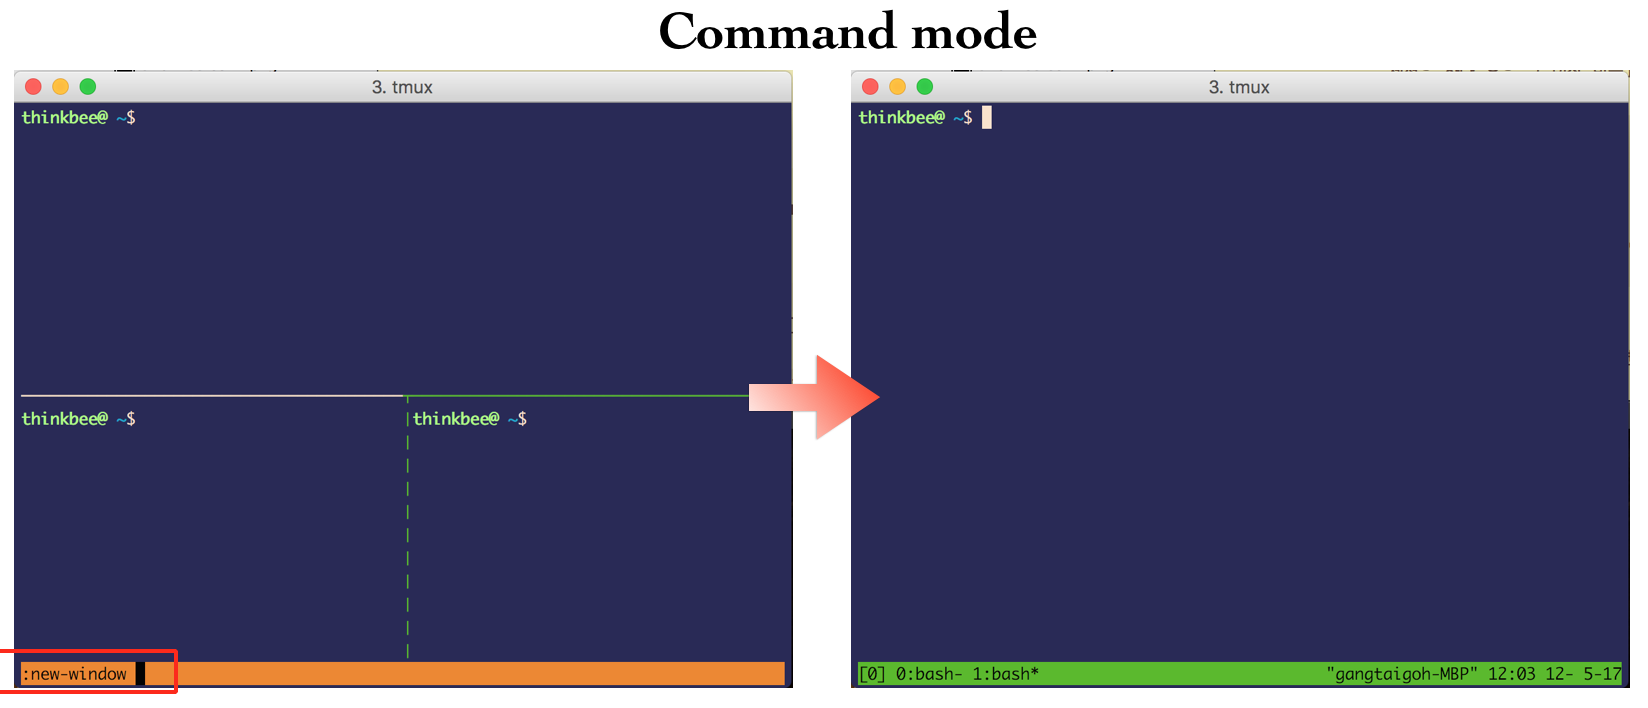
윈도우 명령 control, meta 키 조합과 병행해 윈도우에서 명령모드를 사용할 수 있다. 명령모드는 C-: 키로 시작하고, 명령모드에서 명령 자동 완성을 지원한다.


[그림. Window command mode]

Pane 다루기

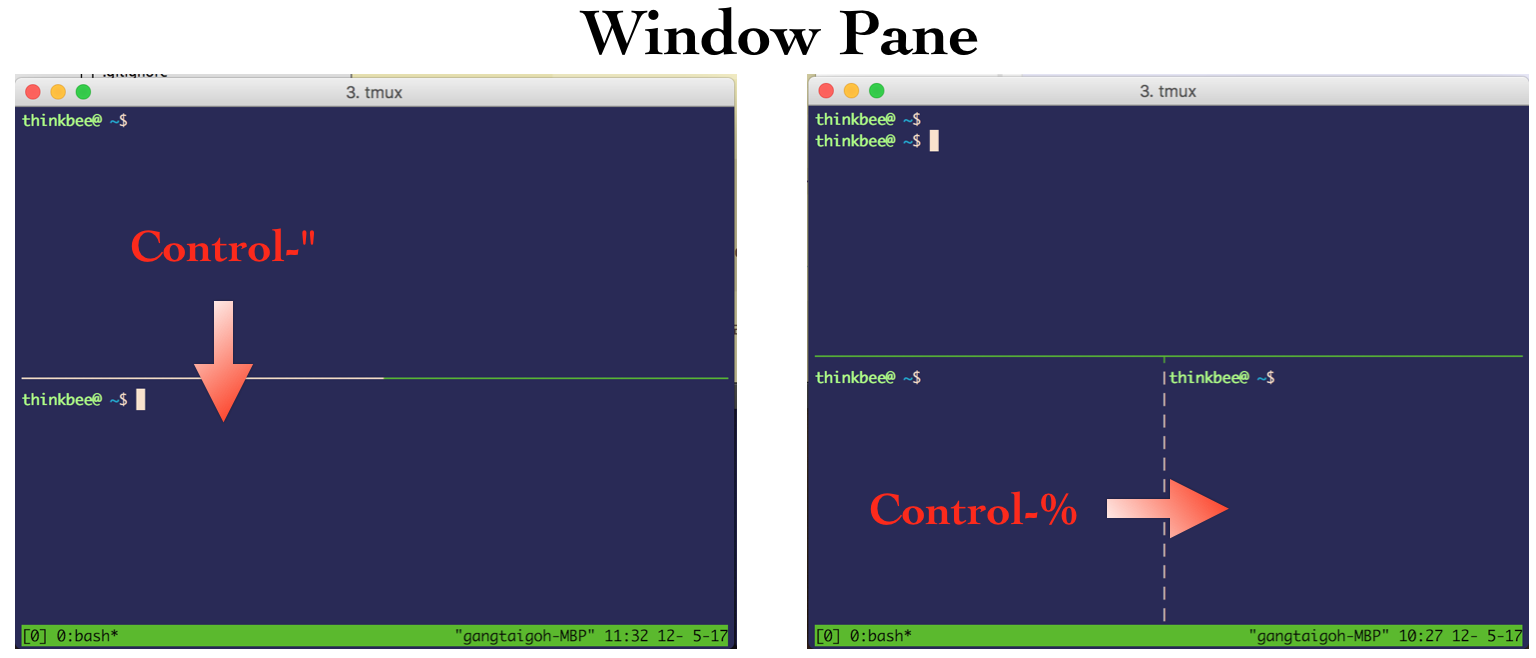
윈도우는 수직/수평으로 구획을 나눌수 있다. C-“ 키로 현재 Pane 아래에 수평으로 새 Pane을 나눈다. 그리고 **C-%**키로 수직으로 새 Pane을 나눌 수 있다.


[그림. Tmux Window Pane]

  • C-q : pane 번호를 표시하고 번호를 눌러서 이동
  • C-o : pane을 순서대로 이동
  • C-방향키 : 해당 방향으로 이동
  • C-M-방향키 : 해당 방향으로 크기 조절
  • C-M-1~5 : 몇 가지 미리 설정된 레이아웃을 고를 수 있고, prefix space로 이 레이아웃을 순서대로 - 돌아가며 선택 가능
  • C-z : 특정화면만 확대하기 다시 예전 Panes상태로 돌아오기

Pane을 지우려면 터미널 exit 명령 혹은 C-x 키로 빠져 나올 수 있다.

Window 다루기

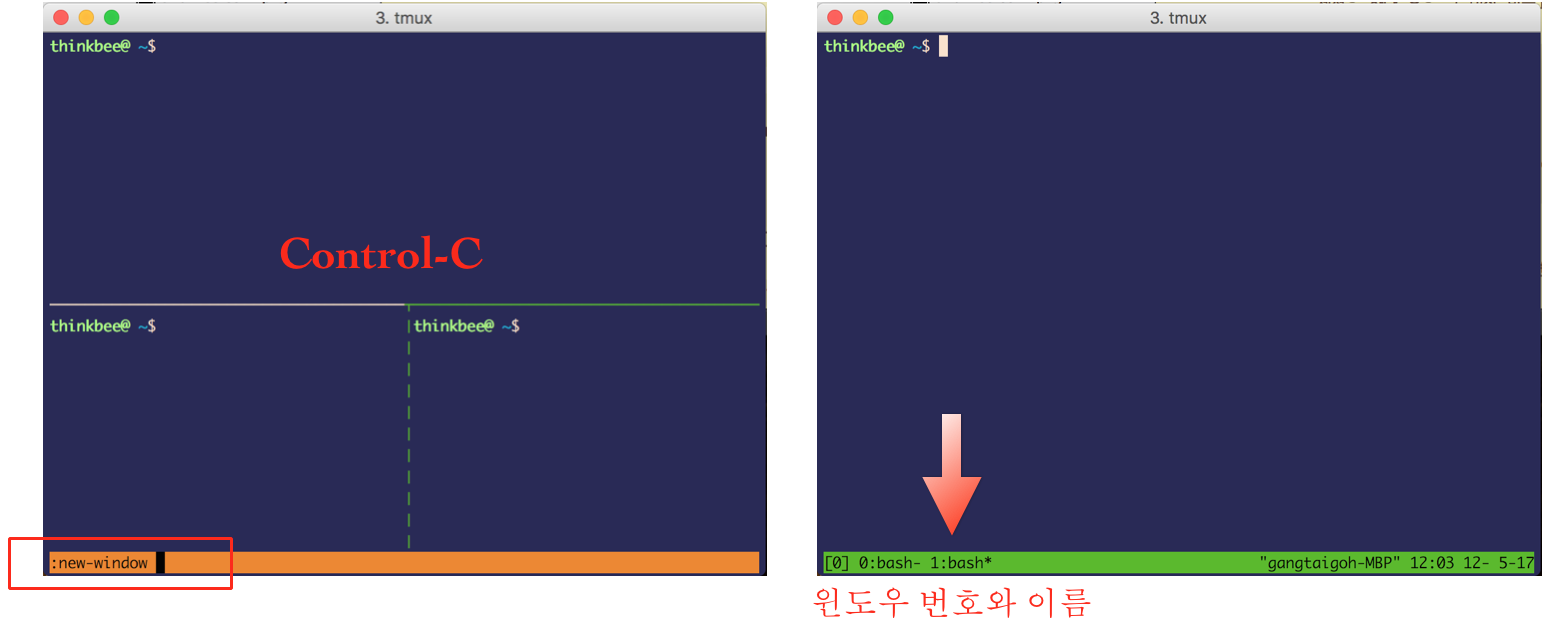
윈도우는 명령모드에서 new-window 혹은 C-c 키로 새 윈도우를 추가할 수 있다.


[그림. new Window ]

윈도우 사이의 이동은 윈도우 번호에 따라 단축키 C-0,1,2…9를 사용하거나 C-w로 윈도우 목록에서 선택해 이동할 수 있다.

  • C-n, C-p : 다음 윈도우, 이전 윈도우로 이동
  • C-l : 직전 사용하던 윈도우로 이동
  • C-w : 윈도우 리스트를 띄우고 선택
  • C-, : 윈도우 이름 바꾸기

세션 사용중에 세션을 빠져 나오려면 C-d 로 detach 하거나, 명령모드 C-:에서 detach 명령을 준다.

복사와 스크롤

Tmux 화면 버퍼는 한 화면분 밖에 안되서, 이전 화면 내용을 보려면 스크롤 기능을 켜야 한다. C+[ 키는 스크롤 키고, 우측상단에 페이지 표시가 나타난다. 키보드 방향키나 Page Up/Down키로 스크롤이 가능하다.

세션 연결

세션은 하나 혹은 그 이상 만들고 attach 명령으로 세션에 참가할 수 있다.

1
2
3
4
$ tmux new -s foo -d     # 세션 foo를 시작하고 빠져나온다.
$ tmux ls # 세션 목록을 출력한다.
0: 1 windows (created Fri May 12 10:26:00 2017) [80x24] (attached)
foo: 1 windows (created Fri May 12 10:34:18 2017) [80x24]

터미널에서 세션에 참가하려면 attach 명령과 대상 세션을 지정해 준다. 대상 세션은 tmux ls 명령에 표시되는 세션번호 혹은 세션이름을 지정한다.

1
2
3
$ tmux attach
$ tmux attach -t 0 # 세션 0번에 참여한다
$ tmux attach -t foo # 세션 foo에 참여한다.

세션을 완전히 종료 시키려면, tmux 세션에서 명령모드 C-: 에서 kill-session 명령을 실행한다.
혹은 다른 터미널에서 세션번호 혹은 세션 이름으로 종료한다.

1
$ tmux kill-session -t 3   # 세션번호 3을 종료한다.

설정파일 .tmux.conf

사용자 홈디렉토리에 .tmux.conf 파일에 tmux에 대한 설정을 명시할 수 있다.

Control + a 사용하기

Capslock키를 Control 키로 대체해 사용하면, Control+a 키 조합이 편하다. .tmux.conf 에 키 조합을 변경한다.

1
2
3
4
5
#Control+a에 'prefix' 연결
set -g prefix C-a
#send-prefix를 Control+a에 전달
bind C-a send-prefix
unbind C-b

위에서 prefix는 C-a 로 재배치된다.

Mouse On/Off

1
2
3
4
5
6
7
8
9
# Toggle mouse on with META m
bind m \
set-option -g mouse on \;\
display 'Mouse: ON'

# Toggle mouse off with META M
bind M \
set-option -g mouse off \;\
display 'Mouse: OFF'

Plugin manager

Tmux Pluin Manager 를 설치하고, tmux 기능을 확장할 수 있다.

tpm 설치

먼저 사용자 홈 디렉토리에 저장한다.

1
$ git clone https://github.com/tmux-plugins/tpm ~/.tmux/plugins/tpm

다음 설정을 tmux.conf 에 저장한다.

1
2
3
4
5
6
7
# List of plugins
set -g @plugin 'tmux-plugins/tpm'
set -g @plugin 'tmux-plugins/tmux-sensible'
set -g @plugin 'tmux-plugins/tmux-resurrect'

# Initialize TMUX plugin manager (keep this line at the very bottom of tmux.conf)
run '~/.tmux/plugins/tpm/tpm'

plugin 관리

플러그인 설치를 위해서 C-I (대문자) 를 실행
플러그인 업그레이드를 위해서 C-U 를 실행

  • 플러그인 목록에서 플러그인을 선택하고 C-M-u (소문자)

Tmux-Resurrection

tmux-resurrect{:.keyword}는 tmux 세션을 백업/복구 할 수 있는 플러그인이다. tmux.conf에 다음을 추가

1
set -g @plugin 'tmux-plugins/tmux-resurrect'

플러그인 설치를 위해서 C-I 를 실행하면 설치를 시작한다.

Resurrection 플러그인으로 백업/복구하는 키는 다음 같이 지정되어 있다:

  • C-s : save
  • C-r : restore

Tmux-continuum

tmux-resurrect{:.keyword} 에서 저장한 환경을 자동으로 저장/복구할 수 있는 플러그인이다.

tmux-continuum{:.keyword} 의 주요 기능은:

  • tmux{:.keyword} 환경을 15분 마다 자동 저장
  • 컴퓨터/서버 시작시 tmux{:.keyword} 자동 시작
  • tmux{:.keyword} 시작시 자동 복구
  • tmux 1.9 이상, bash, tmux-resurrect plugin

설치

.tmux.conf 파일에 아래 플러그인을 추가:

1
2
set -g @plugin 'tmux-plugins/tmux-resurrect'
set -g @plugin 'tmux-plugins/tmux-continuum'

tmux 에서 플러그인 설치를 위해서 C-I (대문자) 를 실행

그리고 .tmux.conf 파일에 continuum-restore 을 on으로 해준다.

1
set -g @continuum-restore 'on'

tmux 세션을 모두 나와서 tmux 서버를 모두 kill-session 같은 명령으로 종료시킨후 tmux를 다시 시작하면 .tmux/resurrect 에 저장된 마지막 세션이 복구되는 것을 확인할 수 있다.

이제부터 15분 마다 자동 저장하고 서버를 재시작한 후에 tmux를 다시 시작하면 저장한 환경을 자동으로 복구해 준다.

tmux status 표시

tmux-continuum 의 상태를 tmux status line에 표시할 수 있다.

1
set -g status-right 'Continuum status: #{continuum_status}'

Linux에서 tmux 자동 시작

tmux-continuum 은 Linux systemd, macOS 에서 자동 시작을 지원한다.

Linux는 .tmux.conf 파일에 다음 부트 옵션을 추가한다.

1
set -g @continuum-boot 'on'

그리고 현재 실행중인 세션에 변경한 설정을 적용하려면

1
$ tmux source-file ~/.tmux.conf

macOS에서 tmux 자동 시작

.tmux.conf 파일에 다음 부트 옵션을 추가한다.

1
set -g @continuum-boot 'on'

그리고 현재 실행중인 세션에 변경한 설정을 적용한다.

1
$ tmux source-file ~/.tmux.conf

맥이 재시작 하면 자동으로 Terminal.app 이 실행된다. 터미널 크기는 다음 옵션으로 지정한다:

1
2
3
4
set -g @continuum-boot-options 'fullscreen' # terminal window will go fullscreen
set -g @continuum-boot-options 'iterm' # start iTerm instead of Terminal.app
set -g @continuum-boot-options 'iterm,fullscreen' # start iTerm in fullscreen

다중 tmux 서버는 지원하지 않는다.

tmux 로 서버를 하나 시작하고, tmux -S /tmp/foo 같이 다른 소켓을 사용했다고 자동 저장/복구가 별도로 진행되지 않는다. [^10]

여기까지 설정한 내용은 qkboo/tmux.conf gist 에서 확인 가능.


### 설정 저장

tmux 설정을 위힌 default 파일이 존재하지 않는다는 점이다. 그래서 tmux 기본 설정을 어딘가 추출해서 보관해두면 다시 돌아오는데 편리하다. 현재 tmux에 설정된 값은 다음 명령어로 추출할 수 있다.

1
$ tmux show -g | sed 's/^/set-option -g /' > ~/.tmux.current.conf

tmux.conf를 적용하는 명령은 source-file이다.

1
$ tmux source-file ~/.tmux.current.conf

Tmux 관련글

  1. Tmux 시작
  2. Tmux cheatsheet

참고

Ubuntu/Debian ARM Cross compile 환경

이 글은 우분투, 리눅스 박스에서 GNU ARM Cross compiler 를 설치하고 관리하는 방법을 다루고 있다.

2018-05-17: sidebar.nav/linux 사용
{: .right-history}

ARM Cross compiler 설치

우분투/데비안 리눅스에서 제공하는 ARM Toolchain 환경은 Linaro 툴체인을 바탕으로 만들어져 있어서 두가지 버전으로 제공된다. Hard Float을 지원하는 버전과 그렇지 않은 버전이다.[^1]

자세히 보기

find 명령 usages

find 명령에서 자주 사용하는 쓰임새를 요약했다.

2018-05: rm, i-node 내용 추가
{:.right-history}

find 명령

find 명령 요약

주어진 이름으로 찾아 화면에 출력한다. -name 은 대소문자 구분한 이름을 준다.

1
find ./ -name '*.xml' -print

주어지는 이름의 패턴은 *? 를 사용할 수 있다.

찾은 결과를 받아 명령의 입력으로 실행할 수 있다. 다음은 현재 디렉토리 밑에서 .c 파일을 찾아 md5sum 으로 해시 값을 출력한다. -iname은 대소문자 구분을 하지 않는다.

1
2
find -iname "*.c" -exec md5sum {} \;
d41d8cd98f00b204e9800998ecf8427e ./mycprogram.c

검색시 탐색 깊이는 -maxdepth 혹은 -mindepth를 사용할 수 있다.

1
find -maxdepth 2 -iname "*.c" -exec md5sum {} \;

어떤 파일을 제외한 것만 찾을 수 있다:

1
find -maxdepth 1 -not -iname "mycprogram.c"

파일의 퍼미션으로 찾을 수 있다.

1
2
3
find . -perm -g=r -type f -exec ls -l {} \;
find . -perm g=r -type f -exec ls -l {} \;
find . -perm 040 -type f -exec ls -l {} \;

찾은 후 삭제하기:

1
find ./ -name 'Debug' -exec rm -rf {} \;

find 명령으로 i-node를 통해서 지우기:

아래 처럼 특수문자로 “~” or “a b c” 등의 이상한 파일이 있을 경우 inode를 확인해 삭제에 유용하다.

1
2
3
4
$ ls -i
$ 32471 a b c
$ find . -inum 32471 -exec rm -rf {} ';'
$ find . -inum 32471 -exec rm -rf {} \;

회피문자 파일 이름 삭제하기

???? 같이 지워지지 안는 파일 같은 경우도 i-node로 삭제할 수 있다.

1
2
3
4
5
6
7
8
9
10
11
~$ ls -ali
~$ ls -ali
total 2068
42467329 drwxr-xr-x 11 qkboo qkboo 4096 Jun 20 22:54 .
2 drwxr-xr-x 10 qkboo qkboo 4096 Jun 1 12:56 ..
42467482 drwxr-xr-x 2 qkboo qkboo 12288 Jul 2 2016 .Picasa3Temp
42598444 drwxrwxrwx 3 qkboo qkboo 4096 Mar 29 23:45 ??????
42475521 drwxr-xr-x 4 qkboo qkboo 4096 Jun 20 22:52 Design_Assets
42467936 drwxr-xr-x 14 qkboo qkboo 4096 Mar 4 16:39 Incoming

~$ find . -inum 42598444 -exec rm {} \;

파일 형식으로 검색

옵션 -type 은 파일 형식으로 찾을 수 있다. 파일 형식은:

b block special
c character special
d directory
f regular file
l symbolic link
p FIFO
s socket

일반 파일

1
find . -type f

소켓 형식의 파일

1
find . -type s

디렉토리 형식

1
find . -type d

숨겨진 파일만 검색도 가능하다.

1
find . -type f -name ".*"

역시 숨겨진 디렉토리만 찾을 수 도 있다.

1
find -type d -name ".*"

파일 크기로 검색

옵션 -size 를 사용해서 파일의 크기로 찾을 수 있다.

아래는 어떤 크기 보다 크거나, 작은 파일을 찾아 준다.

1
2
3
find -size +100M     # 보다 큰 파일
find -size -100M # 보다 작은 파일
find -size 100M # 같은 크기의 파일

다음 같이 응용해 볼 수 있다. 100MB 보다 큰 파일을 찾아 삭제한다:

1
find / -type f -name *.zip -size +100M -exec rm -i {} \;

파일의 수정된 시간을 기준

모든 파일의 수정된 시간 정보를 알 수 있다. test_1.txt의 시간을 기준으로 검색해 보자.

1
2
ls -lrt test_1.txt
-rw-r--r-- 1 gtko gtko 0 2011-02-01 02:26 test_1.txt

옵션 -newer 에 대상 파일을 주면 해당 파일을 생성한 날짜 이후의 결과만을 표시하게 된다.

1
2
3
4
5
find -newer test_1.txt
.
./dir2
./dir2/file2
./dir2/file3

자주 사용할 만한 find 명령

유용한 find 명령들 alias로 만들어 사용하기도 한다.

a.out 인 파일 지우기

1
alias rmao="find . -iname a.out -exec rm {} \;"

c프로그램의 core 파일

1
alias rmc="find . -iname core -exec rm {} \;"

큰 파일 삭제…

1
2
3
4
alias rm100m="find / -type f -name *.tar -size +100M -exec rm -i {} \;"
alias rm1g="find / -type f -name *.tar -size +1G -exec rm -i {} \;"
alias rm2g="find / -type f -name *.tar -size +2G -exec rm -i {} \;"
alias rm5g="find / -type f -name *.tar -size +5G -exec rm -i {} \;"

iconv 와 결합

iconv로 파일 인코딩을 변환할 수 있는데, 많은 파일을 한번에 처리하기 위해서 find와 결합해 찾은 모든 파일의 파일 인코딩을 변환할 수 있다.

다음은 .c 파일을 찾아 인코딩을 euc-kr에서 utf-8로 변환하는 명령이다.

1
find ./ -name '*.c' -exec iconv -feuc-kr -tutf-8 {} -o {} \;

find 를 사용하지 않는다면, 디렉토리 안에 있는 모든 파일의 인코딩을 변환하고자 할 때는 shell 조건문과 섞어서 사용할 수 있다.

1
$ for F in './*.sql'; do iconv -c -feuc-kr -tutf-8 $F -o $F; done

참조

Linux find command examples

update-alternatives 명령 사용

이 글은 우분투, 리눅스 박스에서 여러버전의 도구를 관리할 수 있는 update-alternatives 를 다루고 있다.

update-alternative

update-alternative 유틸리티로 리눅스 기본 제공 개발 환경의 gcc, cross compiler용 gcc 등 여러 버전의 gcc를 사용할 수 있게 구성할 수 있다.
이들 버전의 환경을 교체해서 사용하기를 원한다. update-alternative 도구를 사용할 수 있다.

update-alternative 사용

여러 버전의 gcc를 update-alternative를 사용해서 선택적으로 사용할 수 있다. gcc 로 등록된 현재 버전 목록을 질의 한다.

1
$ update-alternatives --query gcc

등록

여기서 사용하는 여러 gcc 버전들을 설치한 후에 다음과 같은 명령어로 등록을 할 수 있다.

1
update-alternatives --install <link> <name> <path> <priority>
  • 실행파일 이름으로 /etc/alternatives/ 을 가리킨다. (예: /usr/bin/pager)
  • 해당 링크 그룹의 대표 이름으로, 여러 가지 버전의 패키지들을 대표하는 이름으로 보면 될 것 같다.(예: pager)
  • alternatives 로 실제 연결할 실행파일 이름으로, 시스템에 설치한 패키지의 실행파일 이름이다.(예: /usr/bin/less)
  • automatic 모드에서 어떤 것을 자동으로 선택해서 사용할지 결정할 때 사용되는 우선순위로, 높은 수가 더 높은 우선순위이다.

gcc 등록

Ubuntu 14.04 최신 버전에 gcc4.7, 4.8 를 사용하려고 설치했다고 가정한다.

1
2
3
sudo apt-get update
sudo apt-get install gcc-4.7 g++-4.7
sudo apt-get install gcc-4.8 g++-4.8

그리고 gcc 그룹에 4.8를 우선도가 높게 50으로 준다.

1
sudo update-alternatives --install /usr/bin/gcc gcc /usr/bin/gcc-4.8 50 --slave /usr/bin/g++ g++ /usr/bin/g++-4.8

여기서 gcc를 master로 g++을 slave로 준비했다. --slave 옵션은 --install 로 지정한 master에 종속해서 여러개의 슬레이브를 마스터에 추가할 수 있고, 마스터의 링크가 바뀌면 슬레이브도 함께 바뀐다.

두번째 버전은 gcc-4.7 버전을 우선도가 40 정도로 하자.

1
sudo update-alternatives --install /usr/bin/gcc gcc /usr/bin/gcc-4.7 50 --slave /usr/bin/g++ g++ /usr/bin/g++-4.7