Ubuntu/Debian Basic Security settings

리눅스 시스템을 설치후 기본적인 보안 설정과 도구를 사용하는 과정을 정리했다.

  • firewall 과 sshd
  • rootkit
  • fail2ban

Firewall과 ssh 보안 구성

사용자 로그인에 제약을 두고, 원격 접속에 대해서 방화벽과 sshd 보안을 강화한다.

자세히 보기

UFW Firewall on Ubuntu/Debian

일반적인 리눅스 배포본의 방화벽인 ufw` 를 사용해서 리눅스에 방화벽을 구축하는 방법을 기술하고 있다.

  • 2019-12-10: 정리
  • 2017-09-10: Log, export 추가서
    {:.right-history}

여기서 사용, 테스트한 리눅스 배포본은 Ubuntu 14.04, 15.04, 16.04 계열에서 동작하리라 믿는다. 실제 Raspbian Weezy, Jessie, Armbian Ubuntu 16.04, Debian Jessie 에서 사용중이다.

자세히 보기

Linux LVM2

2023-10 add pysical volume to vg
2018-09-19 when umount, device busy!
2018-06-23 mount 명령
{: history-right}

LVM2 를 사용해 물리 disk를 논리 disk로 분할/합병/관리 하는 과정을 조금 정리한 것이다.

LVM2

SBC보드인 Odorid C2에 USB Memory를 사용해서 리눅스의 LVM을 이용하고 있다. 여기서는 LVM 설정에 대해서만 다루고 있다.

Single board computer 종류의 보드는 주 디스크로 SD Card, eMMC 를 사용하고, USB 메모리 등은 디바이스 장치로 /dev/sd* 이름으로 접근할 수 있다.

자세히 보기

Nginx - Install, WebDAV, Proxy on Ubuntu/Debian

nginx를 사용해서 일반 웹 서비스, SSL, WebDav 서비스와 다른 외부 웹 서비스와 연동하는 설정을 해보자.

  • 여기서 node.js 애플리케이션을 연동한다.

## Nginx 설치와 구성

우분투/데비안 계열에서 apt-get install 명령으로 설치한다.

자세히 보기

Odroid - Install Linux

2018-07-10: UART 정보 추가
2017-07-24: exFAT 추가
{:.right-history}

Odroid C2 - Install Armbian

{: width=”600”}

[그림. armv8 Odroid C2]
자세히 보기

Cloud Drives 마운트 사용하기

리눅스 ( 아마 Armbian 서버에서 사용하려고 했었던 것 같다?!)에서 Cloud drive를 사용하고자 한다.

Odroid C2 그리고 Orange-pi 시스템에서 사용할, 데스크탑 환경의 Armbian Xenial에서 사용하기 위해 클라우드 드라이브를 사용할 목적으로 사용했었다.

Google Drive

Google drive는 grive 패키지로 제공되고 있다. 최근 (아마 2016년 이후) Google의 REST API가 바뀌어 grive2 패키지를 사용해야 한다. 패키지 제공이 되지 않으면 소스 빌드해서 사용했다.

grive2 소스 기반 설치

Debian/Ubuntu/Linux Mint 에서 다음 라이브러리가 필요하다:

  • yajl 2.x
  • libcurl
  • libstdc++
  • libgcrypt
  • Boost (Boost filesystem, program_options, regex, unit_test_framework and system are required)
  • expat

다음 같이 cmake 와 필요한 라이브러리를 apt로 설치한다.

1
2
sudo apt-get install git cmake build-essential libgcrypt11-dev libyajl-dev \
libboost-all-dev libcurl4-openssl-dev libexpat1-dev libcppunit-dev binutils-dev pkg-config

빌드

소스 다운로드:

1
2
git clone https://github.com/vitalif/grive2
cd grive2

CMake 로는 다음 같이 빌드 환경을 구성한다

1
2
3
mkdir build
cd build
cmake ..

그리고 Make 로 다음 같이 빌드한다:

1
make -j4

그리고 설치한다:

1
sudo make install

Updates

소스는 git pull 로 최신 소스를 얻고 다시 빌드한다:

1
2
3
4
5
6
cd /path/to/yourGriveSourceCodeDir/grive2
git pull
cd build
cmake ..
make -j4
sudo make install

Usage

인증

1
2
3
4
5
6
7
8
9
10
$ grive -a
-----------------------
Please go to this URL and get an authentication code:

https://accounts.google.com/o/oauth2/auth?scope=https%3A%2F%2Fwww.googleapis.com%2Fauth%....client_id=22314510474.apps.googleusercontent.com
-----------------------
Please input the authentication code here:
5/dTdVFy9xBd2cKLYvkcvJlYhwfht4IPuyJdri2Vv3sKA
Reading local directories
Reading remote server file list

참조


## OneDrive, for Linux

OneDrive, for Linux를 설치해서 사용한다.

설치

https://github.com/skilion/onedrive 와 같이 다운로드해서 설치하거나 apt로 unstable apt로 설치할 수 있다.

source 설치

git-hub 가이드에 따라,

1
2
3
4
5
sudo apt-get install libcurl-dev
sudo apt-get install libsqlite3-dev
sudo wget http://master.dl.sourceforge.net/project/d-apt/files/d-apt.list -O /etc/apt/sources.list.d/d-apt.list
wget -qO - http://dlang.org/d-keyring.gpg | sudo apt-key add -
sudo apt-get update && sudo apt-get install dmd-bin

그런데 Armbian 에서 llibcurl-dev 패키지를 요구해서,

1
2
3
4
5
6
7
$ sudo apt-get install libcurl-dev
Reading state information... Done
Package libcurl-dev is a virtual package provided by:
libcurl4-openssl-dev 7.38.0-4+deb8u5
libcurl4-nss-dev 7.38.0-4+deb8u5
libcurl4-gnutls-dev 7.38.0-4+deb8u5
You should explicitly select one to install.

그래서 libcurl-dev을 설치했다

1
2
$ sudo apt-get install libcurl4-openssl-dev
$ sudo apt-get install libsqlite3-dev

설정

1
2
3
4
$ cat ~/.config/onedrive/config
sync_dir = "~/OneDrive"
skip_file = ".*|~*|thumbs.db|Games/*.iso"
skip_dir = ".*|Music|Movies/FullHD"

사용은

1
2
3
4
5
6
7
$ onedrive -h
Usage: onedrive [OPTION]...
no option Sync and exit.
-m --monitor Keep monitoring for local and remote changes.
--resync Forget the last saved state, perform a full sync.
-v --verbose Print more details, useful for debugging.
-h --help This help information.

참조

Cheat Linux : Output redirection

리눅스 표준 스트림

리눅스 OS 는 터미널의 키보드 입력을 처리할 때 세 가지 표준 스트림으로 보낸다.
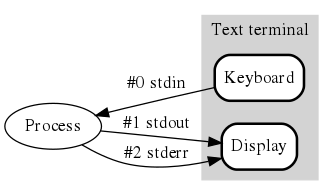
[wikipedia]

그림 같이 세 가지 스트림에 번호를 할당해 제공힌다.

  1. 입력 스트림 Standard Input: 표준 입력으로 0
  2. 출력 스트림 Standard Output: 표준 출력으로 1
  3. 에러 스트림 Standard Error: 표준 에러로 2

이것은 시스템 라이브러리

  • 표준 C 라이브러리 <stdio.h> 에 stdin, stdout, stderr 로 정의
  • 통합 라이브러리 <unistd.h> 에 의해 파일 디스크립터 0, 1, 2 로 표현

위키피디아 표준 스트림

표준 입력출 Redirection

표준 입출력 재지정을 할 수 있는 연산자 >,>>, < 를 사용해서 입출력의 방향을 변경할 수 있다. 시스템 로그를 저장하는 명령에서 다음 같은 경우를 많이 보게 되는데 이런 표준 스트림과 리디렉션 연산자를 사용하는 것이다.

1
$ ls -lR /var/log &> out.txt

Redirection 연산자와 스트림의 출력

연산자 쓰임새 설명
> command > OUTPUT 왼쪽 명령의 결과를 오른쪽 출력 스트림으로 변경한다.
>> command >> OUTPUT 왼쪽 명령의 결과를 오른쪽 출력 스트림에 추가한다.
& command > result > 2&1 스트림의 방향으로 여러 스트림을 설정

표준출력 스트림

1
2
3
4
5
$ echo "hello" > log.txt
$ echo "your welcom" >> log.txt
$ cat log.txt
hello
your welcom

에러출력 스트림

표준 출력 스트림과 연산자를 사용할 수 있다.

명령 재지정 사용
command 2> OUTPUT 명령 결과에서 에러를 오른쪽 출력 스트림으로 변경한다.
1
2
3
4
5
6
$ catty log.txt
Command 'catty' not found, but can be installed with:
sudo apt install node-catty

$ catty log.txt 2> error
$ cat error

에러출력 방향 재지정

명령 실행시 에러가 발생하면 에러 출력이 화면에 나타나는데, 이것을 없애고 싶으면 이럴 때 표준 에러(stderr) 을 화면으로 출력하지 말고 null device 로 출력하도록 redirection 해주면 됩니다.

1
2
$ find ./ -name \*.java -exec -print
find: missing argument to `-exec'

에러 출력을 nul 디바이스로 방향을 전환하면 화면 출력에는 변화가 없다.

1
find ./ -name \*.java -exec -print 2> /dev/nul

출력과 에러출력 방향 동시에 재지정

& 연산자로 출력를 다른 스트림으로 교체하게 한다.

예를 들어 아래 find 명령 결과에 에러가 포함되어 있다.

1
2
3
$ find /var/ -name "*.log" -print
find: ‘/var/spool/cron/atjobs’: Permission denied
find: ‘/var/spool/cron/crontabs’: Permission denied

그래서 출력은 result 파일로 에러는 error 파일로 출력하도록 방향 재지정을 할 수 있다.

1
$ find /var/ -name "*.log" -print > result 2> error

이것은 & 연산자를 사용하면 깔끔하게 처리할 수 있다. 결과는 result 파일에 담기고 에러만 화면에 출력하는 것이다.

1
find /var/ -name "*.log" -print 2>&1 > result

myscript.sh를 실행시 출력은 stdout.txt라는 파일에 쓰고 오류는 stderr.txt라는 파일에 쓰고 싶다면 아래와 같이 사용하면 됩니다.

1
2
$ ./myscript.sh > stdout.txt 2> stderr.txt
(=$ ./myscript.sh 1> stdout.txt 2> stderr.txt)

참고

  1. Linux 표준입출력 재지정
  2. 위키피디아 표준 스트림
  3. 표준입출력 장치 tty, pty 그림

Cheat Linux System

Linux 에서 짬짬히 자주 쓰이는 명령을 설정을 정리.

  1. Disk
    • GRUB, fsck, dd
  2. System 설정
  3. rsync

비슷한 문서:

Disk

GRUB 복구

우분투 부트로더인 GRUB가 잘못되어 복구하려면 해당 배포본의 Live CD, Live USb 등으로 부팅해서 ‘Try Ubuntu’ 에서 터미널을 통해 복구 절차를 시작한다.

https://askubuntu.com/questions/88384/how-can-i-repair-grub-how-to-get-ubuntu-back-after-installing-windows

https://help.ubuntu.com/community/Grub2

https://wiki.ubuntu.com/Grub2#Recover

fsck

fsck(for file system consistency check) 명령은 파일 시스템을 조사하여 손상된 파일을 출력해 주며 사용자에게 그것을 복구할 것인지를 질의

fsck 수행은 시스템마다 약간의 차이가 있지만 대부분 다음과 같은 5개 항목에 대하여 검사

  • Blocks and sizes, Pathname, Connectivity, Reference count, Free List

1
$ sudo fsck –t ext2 /dev/hdb

Attempt to repair damaged blocks

1
$ sudo fsck –a

Repair damaged blocks interactively

1
$ sudo fsck -r <drive>

force

Forcing the check

You can also force fsck at boot time by passing fsck.mode=force, as a kernel parameter. This will check every filesystem you have on the machine.

/forcefsck

Create a file called forcefsck:

1
# touch /forcefsck

Now, reboot the system:

1
# reboot

Frce fsck on next boot using shutdown command (may not work on many modern distros)

The -F option force fsck on reboot, login as root and type the following command to reboot and run fsck:

1
# shutdown -rF now

링크

Changing the check frequency

By default, fsck checks a filesystem every 30 boots (counted individually for each partition). To change the frequency of checking, run:

1
$ sudo tune2fs -c 20 /dev/sda1

exFAT

리눅스테어 외부 USB 디스크를 exFAT로 포맷하고 사용한다면, exfat-fuseexfat-utils를 설치해 준다.

1
$ sudo apt install exfat-fuse exfat-utils

그리고 대부분 최신 리눅스 데스크탑은 USB 디스크를 더블클릭하면 자동마운트 해준다.

터미널에서는

1
2
3
$ sudo mkdir /media/my_usb
$ sudo mount -t exfat /dev/sdb1 /media/my_usb
$ sudo umount /dev/sdb1

참조

  1. https://wiki.archlinux.org/index.php/fsck

dd

블록 크기

디스크에 데이터를 쓸려면 디스크의 기본 블록 크기인 512B 보다 큰게 좋다. 또한 쓰기 속도를 증가시키기 위해서 디스크의 물리적 지형에 맞는 크기를 사용하는 것이 좋다. fdisk 같은 유틸리티로 정보를 확인할 수 있고 혹은 sysfs 정보를 확인할 수 있다.

1
2
3
4
5
6
/sys/block/sdX/size
/sys/block/sdX/queue/physical_block_size
/sys/block/sdX/queue/logical_block_size
/sys/block/sdX/sdXY/alignment_offset
/sys/block/sdX/sdXY/start
/sys/block/sdX/sdXY/size

디스크 지우기

dd에 데이터를 쓸려면 디스크의 기본 블록 크기인 512B 보다 커야 한다. 또한 쓰기 속도를 증가시키기 위해서 디스크의 물리적 지형에 맞는 크기를 사용하는 것이 좋다.

1
$ sudo dd bs=8k if=/dev/urandom of=/dev/rdisk2

fdisk 정보로 확인

1
2
3
4
5
6
7
8
9
10
11
$ sudo fdisk -l /dev/sdb
Disk /dev/sdb: 59.6 GiB, 64021856256 bytes, 125042688 sectors
Units: sectors of 1 * 512 = 512 bytes
Sector size (logical/physical): 512 bytes / 512 bytes
I/O size (minimum/optimal): 512 bytes / 512 bytes
Disklabel type: gpt
Disk identifier: 441CD64A-70D1-4A40-ACA8-05CAB62C5C89

Device Start End Sectors Size Type
/dev/sdb1 2048 8390655 8388608 4G Linux swap
/dev/sdb2 8390656 125042654 116651999 55.6G Linux LVM

fdisk 결과의 Sector size는 전체 용량과 섹터 크기를 계산하면 논릭적인 섹터의 크기를 확인할 수 있다.

1
2
echo $((64021856256/125042688))
512

Sector size (logical/physical): 512 bytes / 512 bytes 에서 물리 크기를 확인할 수 있다.

성능

dd 를 사용해서 1024 바이트를 1000000 블록에 걸쳐 쓰기를 수행한다 - 1GB

1
$ time sudo dd bs=1024 count=1000000 if=/dev/zero of=1GB_file

dd 를 사용해서 1GB 크기 파일을 1024 바이트씩 읽기를 한다.

1
$ time sudo dd bs=1024 if=1GB_file of=/dev/null

Verbose output

Sending an INFO signal to a running dd process makes it print I/O statistics to standard error and then resume copying. In the example below, dd is run in the background to copy 10 million blocks. The kill command makes it output intermediate I/O statistics, and when dd completes normally or is killed by the SIGINT signal, it outputs the final statistics.

1
2
3
4
5
6
7
8
$ dd if=/dev/zero of=/dev/null count=10MB & pid=$!
$ kill -s INFO $pid; wait $pid
3385223+0 records in
3385223+0 records out
1733234176 bytes (1.7 GB) copied, 6.42173 seconds, 270 MB/s
10000000+0 records in
10000000+0 records out
5120000000 bytes (5.1 GB) copied, 18.913 seconds, 271 MB/s

On systems lacking the INFO signal dd responds to the USR1 signal instead, unless the POSIXLY_CORRECT environment variable is set.

You can also try the status=progress option:

1
2
3
4
5
6
[~]$ dd if=/dev/zero of=/dev/null count=10MB status=progress
4708234752 bytes (4.7 GB, 4.4 GiB) copied, 4 s, 1.2 GB/s
10000000+0 records in
10000000+0 records out
5120000000 bytes (5.1 GB, 4.8 GiB) copied, 4.3516 s, 1.2 GB/s
[~]$
참조

System 설정

Time zone

1
$ sudo dpkg-reconfigure tzdata

Keyboard

Capslock과 Control key 교체하기

키맵 이용해서 다음 명령:

1
$setxkbmap -layout us -option ctrl:nocaps
1
2
3
sudo vi /etc/default/keyboard

XKBOPTIONS="ctrl:nocaps"
1
sudo dpkg-reconfigure keyboard-configuration

Terminal Reset

실수로 바이너리 파일을 cat 하거나 하여 글자들이 깨질때.. 터미널 리셋하는 방법

1
2
3
4
5
$ reset
$ tput sgr0
$ setterm -reset
$ setterm -initialize
$ Ctrl + V, Ctrl + O

System Info

1
2
3
cat /etc/os-release     # Raspbian
uname -a
cat /etc/issue

Hardware Info

1
2
3
4
5
6
lscpu
lshw
lspci
lsusb
lsblk // block devices
lspcmcia
1
cat /proc/cpuinfo

BIOS안의 시스템 정보

1
# dmidecode

memory

1
$ free -m

Architecture

1
$cat /etc/issue

Ubuntu 에서

1
$subo lsb_release -a
1
2
$ dpkg --print-architecture      //
armhf
1
2
3
4
5
6
$ uname -a
i686, i386은 32bit, x86_64는 64bit. armv7은 32bit, armv8은 64bit
$ uname -m // machine inf

$ uname -i // hw platform
$ uname -p // processor
1
$ arch // uname -m 과 동일

32bit 64bit 체크

1
$ getconf LONG_BIT // 시스템 구성 질의
1
2
3
4
5
$ file /bin/ls
ELF 32-bit LSB executable, ARM, EABI5 version 1 ..
ARM
arm 7 is 32 bit.
ARMv8-A, October 2011, 64-bit address space and 64-bit arithmetic 지원
1
2
3
4
5
$ uname -m // machine inf
i686 // 32bit
x86_64 // 64bit
armv7l // 32bit
armv8 // 64bit

rsync

http://www.joinc.co.kr/w/Site/Tip/Rsync

rsync -avzh source destination
-a : 심볼릭 링크, 속성, 퍼미션, 소유권 등 보존
-v : 자세한 정보출력
-z : 전송시 압축
-r : 하위디렉토리포함
-e ssh : ssh를 이용한 rsync 동기화
–stats : 결과출력

기본 옵션

1
rsync -av source/ destination/

include와 exclude

이 옵션을 이용해서 대상 파일을 추가하거나 제외 할 수 있다.

1
$ rsync -avz  --exclude 'data' id@192.168.56.101:/home/backups ./

별표(*)도 사용할 수 있다.

1
$ rsync -avz  --exclude '*.cache' id@192.168.56.101:/home/backups ./

증분 백업

수정/변경된 내용만 동기화한다.

rsync -avzh moniwiki/ /tmp/backups/
-h, –human-readable : output numbers in a human-readable format
-u : –update update only (don’t overwrite newer files)
–delete : 서버동기화후 원본에서 파일이 삭제되면 백업에서도 파일을 삭제
–remove-source-files :

1
2
$ rsync -av /home/ /backup/home/ # 원본 증분 백업
$ rsync -av --delete /home/ /backup/home/ #원본 증분 백업, 원본 파일 삭제시 사본에서도 삭제

동기화 옵션

delete 옵션

목적지에 파일이나 디렉토리가 존재할 경우 삭제하고 싶을 때 --delete 옵션을 사용한다.

1
rsync -avz --delete id@192.168.56.101:/home/backups ./

원본 삭제 옵션

--remove-source-files를 이용하면, 전송이 끝난 후 원본파일을 삭제한다.

1
$rsync --remove-source-files -zvh backup.tar /tmp/backups/

ssh 통한 백업

rsync 에는 ssh 를 이용하여 원격서버에 접속하여 동기화를 하는 기능이 있습니다.

1
rsync -azrtv --delete --stats -e "ssh -i /root/.ssh/개인키" 원본서버계정@원본서버주소:원본경로/ /백업경로/

find와 결합

1
find . -type f -mtime -3  | rsync -avz --files-from=- /soucepc /data/backup

faillog

/var/log/faillog 는 계정의 로그인 실폐 횟수 정보를 바이너리 파일로 저장한다. 다음 C struct 구조의 정보가 바이너리로 저장되고 있다:

1
2
3
4
5
6
7
struct    faillog {
short fail_cnt;
short fail_max;
char fail_line[12];
time_t fail_time;
long fail_locktime;
};

직접 읽을 수 없기 때문에 faillog 명령을 사용한다.

1
2
3
4
5
6
$ faillog -u pi        # pi 계정
$ faillog -a
Login Failures Maximum Latest On

root 0 0 01/01/70 00:00:00 +0000
daemon 0 0 01/01/70 00:00:00 +0000

최근 3일의 로그인 실패를 찾으려면 :

1
$ faillog -t 3 -u pi

vnc server

https://www.digitalocean.com/community/tutorials/how-to-install-and-configure-vnc-on-ubuntu-14-04

http://www.whatwant.com/840

1
$ sudo apt-get install gnome-panel tightvncserver

첫 실행을 해서 기본 Config 등의 구성을 하도록 하면 되는데, sudo 없이 계정 권한으로 실행하여도 된다. 계정 권한으로 실행을 하면 해당 계정으로 환경 설정을 한다.

1
$ vncserver

실행할 때에 해상도를 미리 정해줘야 한다.

1
$ vncserver -geometry 1024x768

기본 창 관리자 변경

기본 생성된 xstartup 파일에는 내가 원하는 대로 환경 설정이 되어 있지 않다. 가장 먼저 실행된 vnc4server를 종료부터 하고 xstartup 파일을 수정하자.

1
2
3
4
$ vncserver -kill :1
$ cp ~/.vnc/xstartup ~/.vnc/xstartup.old

$ nano ~/.vnc/xstartup

Linux - X Forwarding

SBC 보드 (raspberry pi, odroid c2 등)를 Terminal 기반으로 사용하려고 할 때 GUI에서 Programming을 확인해야 할 경우 X11, VNC 등을 이용할 수 있다. 여기서는 X Forwarding 기법을 정리하고 있다.

[^1]: Single Board Computer

X11 Forwarding

X11은 유닉스/리눅스의 전통적 데스크탑 프로토콜로 GUI 데스크탑 환경을 X11 Protocol을 사용해서 로컬 혹은 원격지 컴퓨터에서 이용할 수 있게 설계되어 있다.

X Windows: X ming

윈도우즈에서 X ming 환경을 구축하면 X window system을 사용할 수 있다.

자세히 보기

Linux - ssh-sshfs

ssh 사용 팁과 sshfs 이용 방법에 대해서 정리한다.

ssh

터미널에서 ssh를 사용하는데 이용하는 구성과 설정을 정리했다.

비밀키 이용

ssh를 사용하는 클라이언트에서 ssh-keygen 으로 비밀키공개키를 생성하고, 접속하는 서버 계정 밑에 클라이언트 공개키를 저장하면 ssh 접속시 비밀번호 응답 없이 처리되어 로그인 할 수 있다.

1. ssh 클라이언트

클라이언트에서 개인 비밀키를 생성한다. ssh-keygen 명령은 기본적으로 비밀키와 공개키 파일을 사용자 홈디렉토리 ~/.ssh 폴더에, 기본 파일이름 id_rsa.pub, id_rsa.prb 파일로 저장한다.

1
(CLIENT)$ ssh-keygen -t rsa -b 4096 -C "USER@localhost"

2. ssh 서버

서버에도 클라이언트와 동일하게 ssh-keygen 명령으로 비밀키와 공개키를 생성한다.

1
(SERVER)$ ssh-keygen -t rsa -b 4096 -C "USER@server"

서버에 공개키 배포

클라이언트에 생성한 공개키 id_rsa.pub 파일을 업로드해서 ./ssh/authorized_keys 파일에 추가해야 한다. 보통 scp 명령으로 복사해서 authorized_keys 파일에 더해주면 된다.

일반적으로 scp 명령으로 복사하고, 서버에 ssh 접속해서 업로드한 공개키 파일을 authorized_keys 파일에 더해준다.

1. 클라이언트에서 복사하기:

1
scp ~/.ssh/id_rsa.pub USER_ID@HOST_NAME:~/client.pub

ssh로 서버에 로그인한다.

2.서버 authorized_keys 붙여넣기:

1
2
ssh userid@SERVER
(SERVER) $ cat client.pub >> .ssh/authorized_keys; rm client.pub

위 2 과정을 아래 명령 한 줄로 복사->붙여넣기를 동시에 할 수 있다.

클라이언트:

1
cat ~/.ssh/id_rsa.pub | ssh <USERNAME>@<IP-ADDRESS> 'cat >> .ssh/authorized_keys'

이제 해당 서버로 로그인해 본다.

ssh config 사용하기

사용자를 위한 ssh 구성을 하려면 ~.ssh/config 설정 파일을 이용한다.

keep alive session

ssh 접속시 옵션을 주어 세션 유지 시간을 지정할 수 있다.

ServerAliveInterval 사용

접속시 ServerAliveInterval=TICK를 사용하면 TICK초 마다 한번씩 ServerAliveInterval를 보낸다.

옵션을 직접 사용하거나 ~/.ssh/config 설정 파일에 지정해 둘 수 있다.

ssh 접속시 -o 옵션으로 지정한다.

1
ssh -o ServerAliveInterval=10 192.168.0.1

~/.ssh/config 이용

사용자의 ssh 설정 파일은 ~/.ssh/config 이다.

1
2
3
4
5
# For all hosts
ServerAliveInterval 20
# For a selection of hosts
Host 192.168.0.1 192.168.1.1
ServerAliveInterval 20

시스템 전체에 적용한다면 /etc/ssh_config 에 (혹은 데비안 계열은 /etc/ssh/ssh_config) 지정해도 된다.


## sshfs

원격 호스트에서 작업중인 소스등을 편집하는데 터미널로 접속해 vim, nano 같은 편집 도구를 이용할 수 있지만, 개발 컴퓨터에서 손에 익은 GUI 개발 도구를에서 개발하고 편집해서, 원격 호스트에서 실행하는 방법을 선호해서 sshfs를 이용하고 있다.

보통 Sublime Text, TextMate 등의 에디터에서 파이썬 등의 프로그래밍 코드를을 작성하고 sshfs를 이용해 원격 디렉토리에 저장하는 방법을 사한다.

설치

Ubuntu/Debian

1
$sudo apt install sshfs

Mac OS X

Mac OS X Fuse 설치

sshfs 설치후 재시동 필요.

Window

다음 설치 파일을 받아 설치한다.
https://win-sshfs.googlecode.com/files/win-sshfs-0.0.1.5-setup.exe

Mac OS X 사용

Mac OS X에서는 OSXFuse를 사용해서 사용자 계정에서 sshfs를 이용한다. 그래서 sudo 명령을 사용하지 않는다.

1
$ sshfs USER_ID@xxx.xxx.xxx.xxx:/ /Volume/remote

sudo 명령을 이용해서 마운트할 경우 마운트 포인트를 찾지 못해서 다음 같은 에러가 난다.

1
2
$ ls
ls: odoomodules: No such file or directory

Ubunto/Debian

1
sudo sshfs USER_ID@xxx.xxx.xxx.xxx:/ /Volume/remote

사용후 언마운트는 다음과 같다.

1
$sudo umount /Volume/remote

마운트 고정: Mac OS X

https://amaral.northwestern.edu/resources/guides/mounting-remote-folder-os-x-over-ssh

파일 /etc/fstab

1
sshfs#USER_ID@xxx.xxx.xxx.xxx:/ /Volume/remote
DS_Store 파일

OS X는 파일을 다룰 때 .DS_Store 파일로 폴더를 지저분하게 한다. 이것을 비활성화 할 수 있다.
마운트할 때 noappledouble 옵션을 사용한다.

1
2
$ mkdir ~/example
$ sshfs user@host:/example ~/example -oauto_cache,reconnect,defer_permissions,negative_vncache,noappledouble,volname=Example

Mounting an OSX SSH Volume using FUSE and SSHFS

ssh authentication

1
sudo sshfs -o IdentityFile=~/.ssh/id_rsa USER_ID@xxx.xxx.xxx.xxx:/ /Volume/remote

자주사용하는 sshfs 명령

1
2
$ mkdir ~/example
$ sshfs user@host:/example ~/example -oauto_cache,reconnect,defer_permissions,negative_vncache,noappledouble,volname=Example

sshfs options

sshfs 구현마다 조금 다르지만 https://linux.die.net/man/1/sshfs 에서 옵션 내용을 조금 살펴보자:

  • -o reconnect : reconnect to server
  • -o delay_connect : delay connection to server
  • o sshfs_sync: synchronous writes
  • -o no_readahead: synchronous reads (no speculative readahead)
  • -o sshfs_debug: print some debugging information
  • -o cache=BOOL: enable caching {yes,no} (default: yes)
  • -o cache_timeout=N: sets timeout for caches in seconds (default: 20)
  • -o cache_X_timeout=N: sets timeout for {stat,dir,link} cache
  • -o workaround=LIST: colon separated list of workarounds
  • none: no workarounds enabled
  • all: all workarounds enabled

cache

느린 네트워크에서는 캐시를 끄고 사용하는게 좋겠다.

  • -o cache=YESNO: enable caching {yes,no} (default: yes)
  • -o cache_timeout=N : sets timeout for caches in seconds (default: 20)
  • -o cache_X_timeout=N : sets timeout for {stat,dir,link} cache

보증된 네트워크에서 암호화 없이 mount

sshd 가 암호화를 지원하는 상황에서 안된다.

안전한 네트워크에서는 Ciphers, Compression 옵션을 사용 ^Blazingly fast sshfs 하면 빠른 속도를 얻을 수 있다.

1
sshfs -o Ciphers=arcfour -o Compression=no server://some/folder /mnt/some_local_folder
  • Ciphers=arcfour : 빠른 암호화 메서드, 다만 안전하지 않다.
  • Compression : ssh 내장 압축 사용하지 않는다.

rsync 에도 사용할 수 있다.

1
rsync -e"ssh -c arcfour -o Compression=no" ...rest of rsync cmd...

TCP Optimization

MTU(Maximum Transmission Unit)

네트워크 인터페이스에서 세그먼트 없이 보낼수 있는 최대 데이터그램 크기 값입니다. 만약 데이터가 MTU 값 이상이라면 여러개의 패킷으로 분할이 될 것입니다. 간단하게 보자면 MTU 는 패킷이 한번에 보낼 수 있는 최대 크기라고 볼 수 있습니다.

이더넷의 MTU 값은 일반적으로 1500 바이트이며 옛날에 모뎀을 통해 접속하던 PPPoE 연결은 1492 바이트를 가지고 있습니다.

MTU 는 각 패킷 프레임안에 최대 전송할 수 있는 값 MSS(Maximum segment size) 가 정의되어 있습니다. 그렇다면 MTU는 MSS + TCP/IP 헤더 크기가 될 것이고 반대로 MSS 는 MTU - 40 바이트가 됩니다. 40 바이트는 IP 와 TCP 헤더 20 바이트씩을 뜻합니다.

Linux

리눅스에서 MTU 값은 ifconfig 명령으로 확인할 수 있다.

1
2
3
4
5
6
7
8
9
$ ifconfig eth0
eth0 Link encap:Ethernet HWaddr b8:27:eb:c8:5f:4b
inet addr:220.121.140.239 Bcast:220.121.140.255 Mask:255.255.255.0
inet6 addr: fe80::ba27:ebff:fec8:5f4b/64 Scope:Link
UP BROADCAST RUNNING MULTICAST MTU:1500 Metric:1
RX packets:1633606 errors:0 dropped:44758 overruns:0 frame:0
TX packets:73808 errors:0 dropped:0 overruns:0 carrier:0
collisions:0 txqueuelen:1000
RX bytes:85875027 (81.8 MiB) TX bytes:22615535 (21.5 MiB)

기본 MTU가 1500인데 이 값을 조정하려면 sudo ifconfig 명령으로 할 수 있다.

1
$ sudo ifconfig eth0 mtu 9000

재시동 후에도 지속적으로 MTU 값을 유지하고 싶으면 /etc/network/interfaces 에 명시하면 된다.

1
2
3
4
5
auto eth0
iface eth0 inet static
address 192.168.0.2
netmask 255.255.255.0
mtu 9000
링크

MTU

SSHFS-MUX

http://www.linux-magazine.com/Issues/2014/165/SSHFS-MUX

Error

에러 mount_osxfuse: the file system is not available (255)

There appears to be a problem loading the KEXT installed by the regular osxfuse Homebrew package. You can use brew cask to install the official FUSE for OS X build from their own DMG:

1
2
3
brew rm osxfuse
brew install caskroom/cask/brew-cask
brew cask install osxfuse

참조